最近更新時間: 2023/05/01
單純就是個解答的參考,寫完之後再來這邊查查看答案跟你想的一樣不一樣!?
第 03 堂課 (2023/02/20)
- 例題 3.1.1-1:
- 直接使用 cd 切換,之後記得可以 pwd 查看一 下當時的位置:
[student@station10-101 ~]$ cd /dev/shm
[student@station10-101 shm]$ pwd
/dev/shm
- 開始建立目錄,建立完成之後,務必查看一下是否實際建置起來了?
[student@station10-101 shm]$ mkdir class3
[student@station10-101 shm]$ ll
總計 0
drwxr-xr-x. 2 student student  40 Feb 20 10:24 class3   <==確實存在這個目錄了!
- 查看一下剛剛建立的 class3 是否有存在任何資料?
[student@station10-101 shm]$ ll class3/
總計 0
# 在觀察該目錄時,預設好像沒任何資料存在。

[student@station10-101 shm]$ ll -a class3/
total 0
drwxr-xr-x. 2 student student  40 Feb 20 10:24 .
drwxrwxrwt. 5 root    root    100 Feb 20 10:24 ..
# 再觀察隱藏檔,其實,空目錄裡面確實存在了兩個隱藏檔,分別是 . 與 .. 這兩個目錄!
- 開始進行複製的行為看看:
[student@station10-101 shm]$ cp /etc/hosts class3
[student@station10-101 shm]$ ll -a class3/
total 4
drwxr-xr-x. 2 student student  60 Feb 20 10:26 .
drwxrwxrwt. 5 root    root    100 Feb 20 10:24 ..
-rw-r--r--. 1 student student 158 Feb 20 10:26 hosts
# 資料確實複製進來咯!
- 嘗試刪除一下該目錄!
[student@station10-101 shm]$ ll
總計 0
drwxr-xr-x. 2 student student  60 Feb 20 10:26 class3
# 先確定一下,確實有存在這個目錄檔案喔!

[student@station10-101 shm]$ rmdir class3/
rmdir: failed to remove 'class3/': Directory not empty
# 但是無法刪除~說是目錄不是空的。
一般來說,所謂的『空目錄』指的是該目錄底下除了 . 與 .. 之外,不存在任何其他檔名,就是所謂的空目錄。以上面這個案例來說, 因為 class3 還有存在 hosts 這個檔案,因此當然就不是空目錄。而 rmdir 預設只能刪除空目錄,使用 --help 確認一下:[student@station10-101 shm]$ rmdir --help Usage: rmdir [OPTION]... DIRECTORY... Remove the DIRECTORY(ies), if they are empty. ....所以,自然無法刪除 class3 這個目錄了。
- 直接使用 cd 切換,之後記得可以 pwd 查看一 下當時的位置:
- 例題 3.1.1-2:
- 進入該目錄,然後刪除所有檔案。刪除所有檔案可以使用 * 來處理
[student@station10-101 shm]$ cd class3/
[student@station10-101 class3]$ ll
total 4
-rw-r--r--. 1 student student 158 Feb 20 10:26 hosts
# 刪除是很可怕的行為,所以,進行刪除之前,請務必先以 ll 查看一下你要刪除的目錄與資料是否正確!
# 在本例中,該目錄下只有 hosts ,觀察的結果是正確的!所以可以放心刪除了

[student@station10-101 class3]$ rm *
[student@station10-101 class3]$ ll
總計 0
[student@station10-101 class3]$ ll -a
total 0
drwxr-xr-x. 2 student student  40 Feb 20 10:27 .
drwxrwxrwt. 5 root    root    100 Feb 20 10:24 ..
# 目錄中又只剩下 . 與 .. 的空目錄狀態
- 要先離開 class3 ,回到上層,才能夠測試刪除它!
[student@station10-101 class3]$ cd ..
[student@station10-101 shm]$ ll
總計 0
drwxr-xr-x. 2 student student  40 Feb 20 10:27 class3
# 確實存在 class3 這個目錄

[student@station10-101 shm]$ rm class3
rm: cannot remove 'class3/': Is a directory

[student@station10-101 shm]$ rmdir class3/
[student@station10-101 shm]$ ll
總計 0
# 確定刪除了!
因為 rm 『預設』只能刪除檔案,不能刪除目錄檔,除非加上某些特定的選項才行。所以,還是以 rmdir 來刪除空目錄才是。
- 進入該目錄,然後刪除所有檔案。刪除所有檔案可以使用 * 來處理
- 例題 3.1.2-1:
- 查詢上面萬用字元的列表,既然是 5 個字元,所以應該就是有 5 個 ? 的組合就對了。
[student@station10-101 shm]$ ll -d /etc/?????
drwxr-x---. 4 root root  100 Feb 16 11:45 /etc/audit
drwxr-xr-x. 4 root root   71 Feb 16 11:44 /etc/avahi
drwxr-xr-x. 4 root root   31 Feb 16 11:44 /etc/dconf
drwxr-xr-x. 3 root root   38 Feb 16 11:44 /etc/fonts
-rw-r--r--. 1 root root  655 Feb 16 11:42 /etc/fstab
......
如上表,你可以看到輸出的檔名都是 5 個字元! - 數字的排序應該都是從 0 到 9,因此,需要數字時,就是要出現 [0-9] 的模樣。但是因為題目是要求,檔名含有數字,
所以,數字可以在任何地方出現~因此,應該要變成『 *[0-9]* 』這樣的模樣才合理。
[student@station10-101 shm]$ ll -d /etc/*[0-9]*
drwxr-xr-x. 4 root root   78 Feb 16 11:44 /etc/dbus-1
lrwxrwxrwx. 1 root root   22 Nov 18 12:22 /etc/grub2.cfg -> ../boot/grub2/grub.cfg
drwxr-xr-x. 2 root root  159 Feb 16 11:43 /etc/iproute2
-rw-r--r--. 1 root root  880 Nov 16 13:17 /etc/krb5.conf
drwxr-xr-x. 2 root root   83 Feb 16 11:46 /etc/krb5.conf.d
......
- 查詢上面萬用字元的列表,既然是 5 個字元,所以應該就是有 5 個 ? 的組合就對了。
- 例題 3.1.3-1:
- 看一下目的地的位置有沒有其他相同檔名的存在
[student@station10-101 ~]$ cd /dev/shm
[student@station10-101 shm]$ ll
total 0
drwxr-xr-x. 2 student student 60 Feb 20 10:41 mail
drwxrwxr-x. 2 student student 60 Feb 16 11:51 mail2
# 確定不存在 rc.d
- 開始進行複製,請注意,複製時,後面有接一個檔名喔!
[student@station10-101 shm]$ cp -r /etc/rc.d rc.d
[student@station10-101 shm]$ ll
total 0
drwxr-xr-x. 2 student student 60 Feb 20 10:41 mail
drwxrwxr-x. 2 student student 60 Feb 16 11:51 mail2
drwxr-xr-x. 3 student student 80 Feb 20 10:46 rc.d    <==有這個檔名存在!

[student@station10-101 shm]$ ll rc.d
total 4
drwxr-xr-x. 2 student student  60 Feb 20 10:46 init.d
-rw-r--r--. 1 student student 474 Feb 20 10:46 rc.local
# 目錄底下僅有兩個檔名!
- 再次重複執行上面的指令:
[student@station10-101 shm]$ cp -r /etc/rc.d rc.d
[student@station10-101 shm]$ ll
total 0
drwxr-xr-x. 2 student student  60 Feb 20 10:41 mail
drwxrwxr-x. 2 student student  60 Feb 16 11:51 mail2
drwxr-xr-x. 4 student student 100 Feb 20 10:47 rc.d   <==變化不大,只是時間參數改變了
[student@station10-101 shm]$ ll rc.d
total 4
drwxr-xr-x. 2 student student  60 Feb 20 10:46 init.d
drwxr-xr-x. 3 student student  80 Feb 20 10:47 rc.d      <==竟然多了這個檔名出現!
-rw-r--r--. 1 student student 474 Feb 20 10:46 rc.local
第一次複製時,該目錄底下並沒有該檔案,所以複製行為沒問題。第二次複製時,該目標目錄是存在的!所以, 第二次複製時,會將該目錄放置到新目錄底下去,於是就出現最後一行的狀態。這個在執行備份的腳本製作時, 得要特別注意這個問題!
- 看一下目的地的位置有沒有其他相同檔名的存在
- 例題 3.1.3-2:
- 直接進入觀察處理即可
[student@station10-101 shm]$ cd /dev/shm
[student@station10-101 shm]$ ll
total 0
drwxr-xr-x. 2 student student  60 Feb 20 10:41 mail
drwxrwxr-x. 2 student student  60 Feb 16 11:51 mail2
drwxr-xr-x. 4 student student 100 Feb 20 10:47 rc.d   <==目標目錄檔名

[student@station10-101 shm]$ rm rc.d
rm: cannot remove 'rc.d': Is a directory              <==預設就是不能殺目錄

[student@station10-101 shm]$ rm -r rc.d    <==加上 -r 才能刪除目錄!
[student@station10-101 shm]$ ll
total 0
drwxr-xr-x. 2 student student 60 Feb 20 10:41 mail
drwxrwxr-x. 2 student student 60 Feb 16 11:51 mail2
- 直接進入觀察處理即可
- 例題 3.1.4-1:
- 當使用 rm --help 時,會發現如下的情境:
[student@station10-101 shm]$ rm --help
用法:rm [選項]... [檔案]...
Remove (unlink) the FILE(s).
......
To remove a file whose name starts with a '-', for example '-foo',
use one of these commands:
  rm -- -foo

  rm ./-foo
......
在查詢的結果當中發現,檔名的處理可以使用兩種方式,但鳥哥個人比較建議使用相對路徑、絕對路徑的檔名處理方式來略過減號 (-) 的問題即可! 不要增加許多背誦的問題~ - 所以,找到方案了,就直接刪除吧!
[student@station10-101 shm]$ rm -r ./-newdir
[student@station10-101 shm]$ rmdir ./-newdir2
- 當使用 rm --help 時,會發現如下的情境:
- 例題 3.1.5-1:
- 直接使用 file 觀察即可:
[student@station10-101 ~]$ file /var/mail /var/spool/mail /dev/null /dev/vda
/var/mail:       symbolic link to spool/mail  <==連結檔
/var/spool/mail: directory                    <==目錄檔
/dev/null:       character special (1/3)      <==週邊界面檔
/dev/vda:        block special (252/0)        <==區塊裝置 (一般是儲存媒體)
- 直接使用 file 觀察即可:
- 例題 3.1.6-1:
- 直接 cd 即可
[student@station10-101 shm]$ cd
[student@station10-101 ~]$ pwd
/home/student
- 使用目錄複製方式即可處理
[student@station10-101 ~]$ ll -d /etc/rpm
drwxr-xr-x. 2 root root 25 Nov 16 00:43 /etc/rpm

[student@station10-101 ~]$ cp -a /etc/rpm .
[student@station10-101 ~]$ ll -d rpm
drwxr-xr-x. 2 student student 25 Nov 16 00:43 rpm
- 不需要重新複製,而是需要進行移動的行為!處理方式如下:
[student@station10-101 ~]$ mv rpm /dev/shm
[student@station10-101 ~]$ ll -d rpm
ls: 無法存取 'rpm': 沒有此一檔案或目錄

[student@station10-101 ~]$ ll /dev/shm
total 0
drwxr-xr-x. 2 student student 60 Feb 20 10:41 mail
drwxrwxr-x. 2 student student 60 Feb 16 11:51 mail2
drwxr-xr-x. 2 student student 60 Nov 16 00:43 rpm    <==在這裡了
- 最終更名也是需要 mv 的!
[student@station10-101 ~]$ cd /dev/shm
[student@station10-101 shm]$ ll -d rpm
drwxr-xr-x. 2 student student 60 Nov 16 00:43 rpm

[student@station10-101 shm]$ mv rpm mail3
[student@station10-101 shm]$ ll
total 0
drwxr-xr-x. 2 student student 60 Feb 20 10:41 mail
drwxrwxr-x. 2 student student 60 Feb 16 11:51 mail2
drwxr-xr-x. 2 student student 60 Nov 16 00:43 mail3    <==在這裡了
- 直接 cd 即可
- 例題 3.1.7-1:
- 記得可以使用大括號 {} 來連續建置許多檔案喔
# 先建立所需要的工作目錄
[student@station10-101 shm]$ mkdir /dev/shm/testing
[student@station10-101 shm]$ cd /dev/shm/testing
[student@station10-101 testing]$ pwd
/dev/shm/testing

# 開始建立這許多的空檔案
[student@station10-101 testing]$ touch mytest_{jan,feb,mar,apr}_{one,two,three}_{a1,b1,c1}
[student@station10-101 testing]$ ls
mytest_apr_one_a1    mytest_feb_one_a1    mytest_jan_one_a1    mytest_mar_one_a1
mytest_apr_one_b1    mytest_feb_one_b1    mytest_jan_one_b1    mytest_mar_one_b1
mytest_apr_one_c1    mytest_feb_one_c1    mytest_jan_one_c1    mytest_mar_one_c1
mytest_apr_three_a1  mytest_feb_three_a1  mytest_jan_three_a1  mytest_mar_three_a1
mytest_apr_three_b1  mytest_feb_three_b1  mytest_jan_three_b1  mytest_mar_three_b1
mytest_apr_three_c1  mytest_feb_three_c1  mytest_jan_three_c1  mytest_mar_three_c1
mytest_apr_two_a1    mytest_feb_two_a1    mytest_jan_two_a1    mytest_mar_two_a1
mytest_apr_two_b1    mytest_feb_two_b1    mytest_jan_two_b1    mytest_mar_two_b1
mytest_apr_two_c1    mytest_feb_two_c1    mytest_jan_two_c1    mytest_mar_two_c1
- 接下來的動作也一樣,只是連續的數值之間,使用兩個小數點來連接即可
[student@station10-101 testing]$ mkdir /dev/shm/student
[student@station10-101 testing]$ cd /dev/shm/student
[student@station10-101 student]$ touch 4XXXC0{01..50}
[student@station10-101 student]$ ls
4XXXC001  4XXXC006  4XXXC011  4XXXC016  4XXXC021  4XXXC026  4XXXC031  4XXXC036  4XXXC041  4XXXC046
4XXXC002  4XXXC007  4XXXC012  4XXXC017  4XXXC022  4XXXC027  4XXXC032  4XXXC037  4XXXC042  4XXXC047
4XXXC003  4XXXC008  4XXXC013  4XXXC018  4XXXC023  4XXXC028  4XXXC033  4XXXC038  4XXXC043  4XXXC048
4XXXC004  4XXXC009  4XXXC014  4XXXC019  4XXXC024  4XXXC029  4XXXC034  4XXXC039  4XXXC044  4XXXC049
4XXXC005  4XXXC010  4XXXC015  4XXXC020  4XXXC025  4XXXC030  4XXXC035  4XXXC040  4XXXC045  4XXXC050
- 記得可以使用大括號 {} 來連續建置許多檔案喔
- 例題 3.2.1-1:
- 因為單純要列出所有的資訊,可以直接使用 cat 處理即可:
[student@station10-101 ~]$ cat /etc/hosts 127.0.0.1 localhost localhost.localdomain localhost4 localhost4.localdomain4 ::1 localhost localhost.localdomain localhost6 localhost6.localdomain6 - 同樣使用 cat 處理即可
[student@station10-101 ~]$ cat /etc/profile # /etc/profile # System wide environment and startup programs, for login setup # Functions and aliases go in /etc/bashrc ...... - 上面的資料量稍嫌多了些,我想要知道行號的表示,可以查詢 cat --help 測試,然後再處理即可
[student@station10-101 ~]$ cat --help
用法:cat [選項]... [檔案]...
Concatenate FILE(s) to standard output.

......
  -n, --number             number all output lines
......

[student@station10-101 ~]$ cat -n /etc/profile
     1  # /etc/profile
     2
     3  # System wide environment and startup programs, for login setup
     4  # Functions and aliases go in /etc/bashrc
     5
......
    76                  . /etc/bashrc
    77         fi
    78  fi
- 列出前面十行,可以使用 head 處理
[student@station10-101 ~]$ head /etc/profile - 列出後面 10 行可以用 tail 處理
[student@station10-101 ~]$ tail /etc/passwd - 預設 head 與 tail 是輸出 10 行,若需要有不同行數,可以參考 tail --help 的說明:
[student@station10-101 ~]$ tail --help
用法:tail [選項]... [檔案]...
Print the last 10 lines of each FILE to standard output.
With more than one FILE, precede each with a header giving the file name.
......
  -n, --lines=[+]NUM       output the last NUM lines, instead of the last 10;
                             or use -n +NUM to output starting with line NUM
......

[student@station10-101 ~]$ tail -n 5 /etc/services
- 因為單純要列出所有的資訊,可以直接使用 cat 處理即可:
- 例題 3.2.2-1:
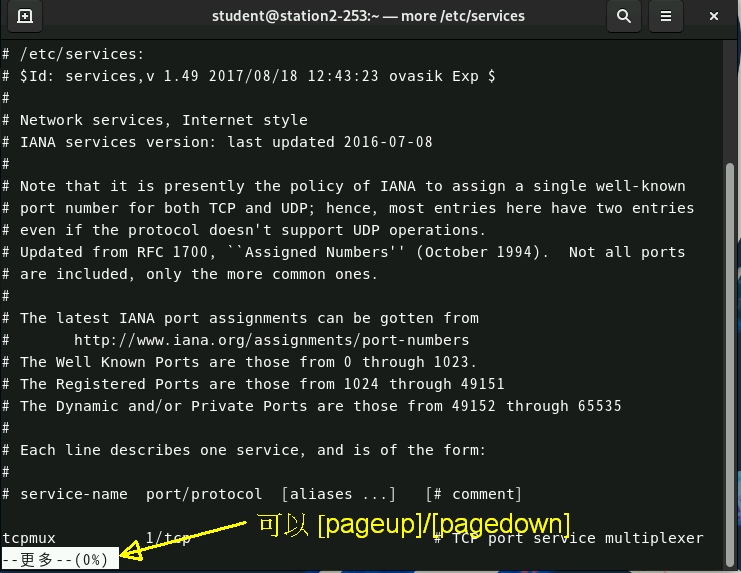
- 使用『 more /etc/services 』之後,會出現如下的圖示:

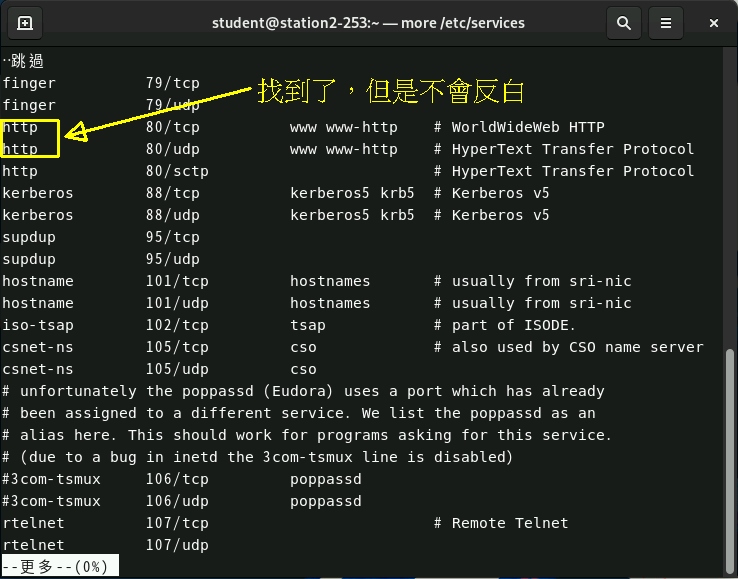
more 與 less 的使用 - 在上面的畫面,直接輸入『 /http 』之後,會出現如下的圖示,然後按下『 q 』就可以離開 more 軟體

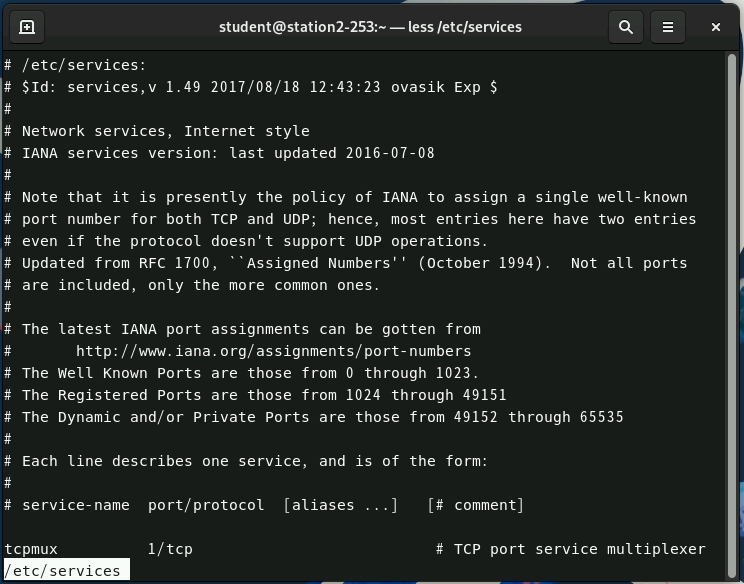
more 與 less 的使用 - 使用『 less /etc/services 』之後,會出現如下的圖示:

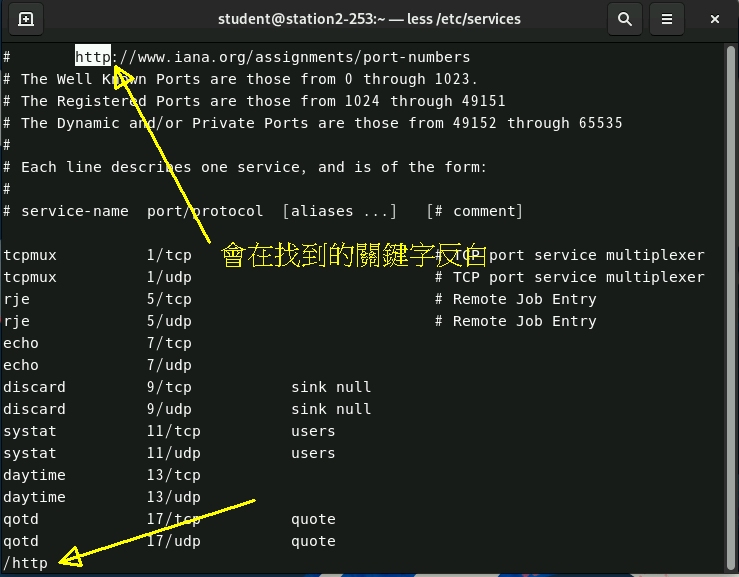
more 與 less 的使用 - 在上面的畫面,直接輸入『 /http 』之後,會出現如下的圖示,然後按下『 q 』就可以離開 less 軟體

more 與 less 的使用
- 使用『 more /etc/services 』之後,會出現如下的圖示:
- 例題 3.3.1-1:
- vim services
- (a)先移動游標到第一行 (b)按下 [i] 進入編輯模式 (c)按下 [enter] 新增一行 (d)回到第一行 (e)加入『Welcome to my linux server』 (f)按下 [esc]
- (a)移動游標到第 5 行 (b)按下 dd ,會發現原本的第 5 行被刪除了一整行
- (a)移動游標到第 1 行 (b)按下 p,會發現剛剛被刪除的那一行,貼在底下的第 2 行上
- (a)連按 5 次 p,會發現連續貼 5 次; (b)按下 5p,會直接貼 5 次!
- 按下 u 會回復一次動作,所以前面的 5p 動作會被復原
- (a)移動游標到第 1 行 (b)按下 yy 時,螢幕不會顯示任何資訊 (c)游標移動到第 10 行 (d)按下 p 後,會將剛剛複製的第一行貼在第 11 行上
- 按下大寫的 G 會讓游標移動到最後一行
- 按下兩個小寫的 g ,就是 gg ,會讓游標移動到第 1 行
- 按下『 :q! 』會強迫離開!
- 例題 3.3.2-1:
- 直接使用 history 查看一下,並且記憶一下這次自己輸入的指令號碼:
[student@station10-101 shm]$ cd
[student@station10-101 ~]$ history
......
  334  cd /dev/shm
  335  mkdir "class one"
  336  ll
......
  391  touch mytest_{jan,feb,mar,apr}_{one,two,three}_{a1,b1,c1}
  392  ls
  393  mkdir /dev/shm/student
  394  cd /dev/shm/student
  395  touch 4XXXC0{01..50}
......
  408  vim services
  409  cd
  410  history
假設看起來就是 334 到 410 之間的指令,所以大概有 80 行左右。 - 將最後面的 80 個指令紀錄下來:
[student@station10-101 ~]$ history 80 >> ~/history.log - 使用 vim ,將不要的資料刪除掉,例如前面的行號是不需要的,可以使用 [ctrl]+v 選取後,直接 d 掉!
[student@station10-101 ~]$ vim ~/history.log
 334 cd /dev/shm
 335 mkdir "class one"
 341 rmdir class one
 342 rmdir class\ one/
 345 mkdir /dev/shm/-newdir
 346 mkdir ./-newdir2
 347 ll -d ./*new*
 348 rm --help
 350 rm -r ./-newdir*
 353 ll -a
# 上面的反白處理流程是這樣的:
# 1. 先到第一列的第一個字元上面,按下 [ctrl]+v ,這時會變成選取模式
# 2. 使用方向鍵,移動到最底下,然後向右,就可以圈選到你的範圍
# 3. 按下 d ,就可以刪除上面圈選的部份了!
# 4. 最後按下 :w 儲存,再按下 :q 就可以離開!
- 直接使用 history 查看一下,並且記憶一下這次自己輸入的指令號碼:
- 例題 3.4 課後作業:
- 關於 vim 建立檔案的實做:
- 建立檔案使用『 vim /dev/shm/mycheck.txt 』來建立,進入該檔案之後,按下『 i 』來進行編輯,
第一行寫姓名、第二行寫學號,之後按下『 esc 』回到一般指令列模式,之後按『 :w 』儲存,
按下『 :q 』離開即可。
[student@station10-101 ~]$ vim /dev/shm/mycheck.txt
[student@station10-101 ~]$ ll /dev/shm/mycheck.txt
-rw-rw-r--. 1 student student 17  3月 10 22:54 /dev/shm/mycheck.txt
[student@station10-101 ~]$ cat /dev/shm/mycheck.txt
鳥哥
4100cxxx
- 使用 file 去檢查,然後將資料累加到檔案去
[student@station10-101 ~]$ file /etc/group /bin/groups
/etc/group:  ASCII text
/bin/groups: ELF 64-bit LSB pie executable, x86-64, version 1 (SYSV), dynamically linked, interpreter /lib64/ld-linux-x86-64.so.2, BuildID[sha1]=b69164ab3d934ee8a7d2a8f4cb12fff6de887846, for GNU/Linux 3.2.0, stripped
[student@station10-101 ~]$ file /etc/group /bin/groups >> /dev/shm/mycheck.txt
[student@station10-101 ~]$ cat /dev/shm/mycheck.txt
鳥哥
4100cxxx
/etc/group:  ASCII text
/bin/groups: ELF 64-bit LSB pie executable, x86-64, version 1 (SYSV), dynamically linked, interpreter /lib64/ld-linux-x86-64.so.2, BuildID[sha1]=b69164ab3d934ee8a7d2a8f4cb12fff6de887846, for GNU/Linux 3.2.0, stripped
- 開始處理檔名查詢與轉存
[student@station10-101 ~]$ ll -d /etc/s*s
-rw-r--r--. 1 root root 692241  9月 10  2018 /etc/services
-rw-r--r--. 1 root root     44  9月 10  2018 /etc/shells
drwxr-xr-x. 3 root root     74  2月 26 09:06 /etc/smartmontools
-r--r-----. 1 root root   4328 12月 13 20:56 /etc/sudoers
[student@station10-101 ~]$ ll -d /etc/s*s >> /dev/shm/mycheck.txt
[student@station10-101 ~]$ tail -n 4 /dev/shm/mycheck.txt
-rw-r--r--. 1 root root 692241  9月 10  2018 /etc/services
-rw-r--r--. 1 root root     44  9月 10  2018 /etc/shells
drwxr-xr-x. 3 root root     74  2月 26 09:06 /etc/smartmontools
-r--r-----. 1 root root   4328 12月 13 20:56 /etc/sudoers
- 開始查詢 history ,搭配 grep 做資料的篩選
[student@station10-101 ~]$ history | grep 'rm '
  191  rm --help
  192  rm /dev/shm/backup/etc/passwd*
  196  rm /dev/shm/backup/etc/X11
  198  rm -r /dev/shm/backup/etc/X11
  201  rm -ri /dev/shm/backup/etc/xdg/
  202  rm -rI /dev/shm/backup/etc/xdg/
  239  rm ./X11/xinit
  240  rm -r ./X11/xinit
  258  rm hosts
  269  rm *
  275  rm class3
  289  rm rc0.d
  293  rm rc0.d
  308  rm -r rc0.d/
  313  rm init.d
  331  rm rc1.d
  332  rm -r rc1.d
  348  rm --help
  350  rm -r ./-newdir*
  446  history | grep 'rm '
[student@station10-101 ~]$ history | grep 'rm ' >> /dev/shm/mycheck.txt
- 檢查前幾行與後幾行,題目沒提到一次做完,所以也可以分開做:
[student@station10-101 ~]$ cat -n /etc/passwd | head -n 5
     1  root:x:0:0:root:/root:/bin/bash
     2  bin:x:1:1:bin:/bin:/sbin/nologin
     3  daemon:x:2:2:daemon:/sbin:/sbin/nologin
     4  adm:x:3:4:adm:/var/adm:/sbin/nologin
     5  lp:x:4:7:lp:/var/spool/lpd:/sbin/nologin
[student@station10-101 ~]$ cat -n /etc/passwd | tail -n 5
    40  gnome-initial-setup:x:979:977::/run/gnome-initial-setup/:/sbin/nologin
    41  sshd:x:74:74:Privilege-separated SSH:/var/empty/sshd:/sbin/nologin
    42  avahi:x:70:70:Avahi mDNS/DNS-SD Stack:/var/run/avahi-daemon:/sbin/nologin
    43  tcpdump:x:72:72::/:/sbin/nologin
    44  student:x:1000:1000:student:/home/student:/bin/bash
[student@station10-101 ~]$ cat -n /etc/passwd | head -n 5 >> /dev/shm/mycheck.txt
[student@station10-101 ~]$ cat -n /etc/passwd | tail -n 5 >> /dev/shm/mycheck.txt
- 建立檔案使用『 vim /dev/shm/mycheck.txt 』來建立,進入該檔案之後,按下『 i 』來進行編輯,
第一行寫姓名、第二行寫學號,之後按下『 esc 』回到一般指令列模式,之後按『 :w 』儲存,
按下『 :q 』離開即可。
- 檔案管理
- 建立 100 個空檔案:
[student@station10-101 ~]$ mkdir /dev/shm/unit03
[student@station10-101 ~]$ mkdir /dev/shm/unit03/files
[student@station10-101 ~]$ cd /dev/shm/unit03/files
[student@station10-101 files]$ touch ksu{001..100}
[student@station10-101 files]$ ll
總計 0
-rw-rw-r--. 1 student student 0  3月 10 23:07 ksu001
-rw-rw-r--. 1 student student 0  3月 10 23:07 ksu002
......
- 建立 10 個空檔案
[student@station10-101 files]$ cd ..
[student@station10-101 unit03]$ mkdir dirs
[student@station10-101 unit03]$ cd dirs
[student@station10-101 dirs]$ pwd
/dev/shm/unit03/dirs

[student@station10-101 dirs]$ mkdir dir{01..10}
[student@station10-101 dirs]$ ll
總計 0
drwxrwxr-x. 2 student student 40  3月 10 23:10 dir01
drwxrwxr-x. 2 student student 40  3月 10 23:10 dir02
......
- 建立三個目錄
[student@station10-101 dirs]$ cd ..
[student@station10-101 unit03]$ mkdir season
[student@station10-101 unit03]$ cd season/
[student@station10-101 season]$ mkdir jan feb mar
[student@station10-101 season]$ ll
總計 0
drwxrwxr-x. 2 student student 40  3月 10 23:12 feb
drwxrwxr-x. 2 student student 40  3月 10 23:12 jan
drwxrwxr-x. 2 student student 40  3月 10 23:12 mar
- 建立子目錄底下的空檔案
[student@station10-101 season]$ touch {jan,feb,mar}/mylog_{1..9}_{aa,bb}_{start,end}.txt
[student@station10-101 season]$ ll -R
.:
總計 0
drwxrwxr-x. 2 student student 760  3月 10 23:14 feb
drwxrwxr-x. 2 student student 760  3月 10 23:14 jan
drwxrwxr-x. 2 student student 760  3月 10 23:14 mar

./feb:
總計 0
-rw-rw-r--. 1 student student 0  3月 10 23:14 mylog_1_aa_end.txt
-rw-rw-r--. 1 student student 0  3月 10 23:14 mylog_1_aa_start.txt
- 建立特殊檔案來處理:
[student@station10-101 season]$ cd ..
[student@station10-101 unit03]$ mkdir spc
[student@station10-101 unit03]$ cd spc
[student@station10-101 spc]$ mkdir ./-check.txt
[student@station10-101 spc]$ ll
總計 0
drwxrwxr-x. 2 student student 40  3月 10 23:24 -check.txt
- 建立 100 個空檔案:
- 關於 vim 建立檔案的實做:
修改歷史:

- 2023/02/17:RHEL 改版到 EL9 了,只好再度改版!否則教學上面挺困擾!

