最近更新時間: 2003/08/22
多個 IP 在一塊網路卡上面:
:為何多 IP
:如何實作:command line, 參數設定檔
:注意事項
路由器 Router:
:什麼是 Router
:為何需要 Router
:觀察與修改路由
一個 Router 架設範例:
建議:
重點回顧:
課後練習:
多個 IP 在一塊網路卡上面:
- 在開始介紹 Router 之前,我們先就一個實體網路卡進行多個 IP 的設定來作為介紹,然後再實際來說明
Router 的架設吧!
- 由於 eth0:n 是依附在 eth0 這個介面上面的,所以開機的時候,不論 eth0:n 裡面設定 ONBOOT 為何,只要 eth0 設定為 ONBOOT=yes,那麼開機之後,所有與 eth0 相關的介面都會被啟動起來,另外, eth0:n 不能單獨的被啟動, eth0 一定要先啟動才行!
- 既然可以設定多個 IP ,那麼流量是否可以增加?!答案是『否』,因為控制頻寬的是硬體,您的網路卡就是那一塊,當然無法增加流量了。所以一張卡設定多 IP 時,那些 IP 就不要在同一個網域內了!
為何需要多 IP ?
好好一塊網路卡,為何需要多個 IP 呢?難道是鳥哥沒事找事作?!嘿嘿!我又不是閒的發慌,幹嘛沒事找事作呢?!其實多個 IP 某些時候是有其必要性的啦!在什麼時候『可能』會用的上呢?這樣說好了現在您的區域網路當中,由於有些朋友一開始設定錯誤,結果一個 Hub 卻接了兩個網域,分別是192.168.1.xx 及 192.168.0.xx ,但是您的朋友們卻又都不想改變他們的網路設定,這個時候怎麼辦?『因為不同的網域之間的資料封包不能直接互相溝通』這個概念還沒忘記吧?!所以 192.168.1.xx 及 192.168.0.xx 就不能直接溝通資料囉!因此,您如果要與 192.168.1.xx 溝通,您的 IP 就必須設定在該網域內,但這個時候另一個網域 192.168.0.xx 的資料卻又無法溝通了!所以您就必須要常常變更 IP 囉!那您又不想常常變更您的 IP ,呵呵!這個時候多個 IP 就派上用場啦!您可以在一塊網路卡上面同時設定 192.168.0.xx 及 192.168.1.xx 的 IP ,如此則您的系統可同時接受來自這兩個不同網域的資料!嘿!還不錯吧!
除此之外,其實還有很多的用的到多個 IP 的地方啦!例如 Router 的設定,有時後也會使用的到的!另外,在測試系統的時候,也常常會使用到多 IP 的設定!基本上,多 IP 的用途還不少就是了!
如何實作?
其實多個 IP 在一塊網路卡上面的設定很簡單啦!就只要記得一個概念就夠了,那就是網路界面卡( Network Interface Card, NIC )與網路界面( Interface )不一樣的東西!一個是實體界面,一個則是連線後所產生的界面,兩者並不相同!但是 Interface 必需要架構在 NIC 或實際的網路媒介 (如數據機) 之上才行!好了!我們來談一談實際面吧!
如果您還記得 Linux 底下的硬體裝置都是以檔案來代表的話,那麼就應該知道 Linux 第一塊網路卡的代號為 eth0 吧?!OK!那麼在這個網路卡上面的第一個虛擬界面( Interface )的代號是什麼呢?那就是 eth0:0 囉!第二個虛擬界面則為 eth0:1 .....以此類推!而要啟動 eth0:0 時, eth0 務必要被啟動,而當關閉 eth0 時,其所有相關的 eth0:n ( n 是數字,0, 1....)將會全部被關閉!這就是剛剛上面提到的『虛擬界面是架構在實體界面之上』的意思!嗯!由於設定的方式主要又可以分為直接以『 command line 』手動啟動,也可以使用『 裝置設定檔案 』來設定!我們分別說明如下囉!
command line 手動設定多個 IP :
在 Linux 網路常用指令篇 裡面我們曾經提到 ifconfig 可以用來達成多個 IP 的設定功能!他的主要設定語法與範例為:
| [root@test
root]# ifconfig <device> <ip> netmask
<nip> broadcast <bip> <action>
參數說明: <device> :裝置代號,例如 eth0, eth0:0, eth0:1.... <ip> :該裝置代號的 IP ! netmask :該裝置代號的子網域遮罩設定參數名稱 <nip> :就是實際的 netmask ,例如 C Class 則為 255.255.255.0 boradcast :廣播位址設定參數 <bip> :亦即實際的廣播位址 <action> :動作!例如 up 啟動與 down 關閉! 範例: # 1. 修改一個 eth0 的 netmask ,由原先的 255.255.255.0 變成 255.255.255.128 [root@test root]# ifconfig eth0 eth0 Link encap:Ethernet HWaddr 00:50:FC:22:9C:57 inet addr:192.168.1.2 Bcast:192.168.1.255 Mask:255.255.255.0<=原先的! UP BROADCAST RUNNING MULTICAST MTU:1500 Metric:1 RX packets:5972569 errors:0 dropped:0 overruns:0 frame:0 TX packets:6263943 errors:0 dropped:0 overruns:0 carrier:0 collisions:1331 txqueuelen:100 RX bytes:557413197 (531.5 Mb) TX bytes:2810197942 (2680.0 Mb) Interrupt:10 Base address:0x6100 [root@test root]# ifconfig eth0 netmask 255.255.255.128 [root@test root]# ifconfig eth0 eth0 Link encap:Ethernet HWaddr 00:50:FC:22:9C:57 inet addr:192.168.1.2 Bcast:192.168.1.255 Mask:255.255.255.128<=修改後 UP BROADCAST RUNNING MULTICAST MTU:1500 Metric:1 RX packets:5972745 errors:0 dropped:0 overruns:0 frame:0 TX packets:6264165 errors:0 dropped:0 overruns:0 carrier:0 collisions:1331 txqueuelen:100 RX bytes:557431640 (531.6 Mb) TX bytes:2810221471 (2680.0 Mb) Interrupt:10 Base address:0x6100 [root @test /root]# ifconfig eth0 netmask 255.255.255.0<==測試完後記得改回來! 2. 新增一個網路界面 eth0:0 ,而且他的 IP 為 192.168.0.2 [root@test root]# ifconfig eth0:0 192.168.0.2 netmask 255.255.255.0 \ > broadcast 192.168.0.255 up [root@test root]# ifconfig eth0; ifconfig eth0:0 eth0 Link encap:Ethernet HWaddr 00:50:FC:22:9C:57 inet addr:192.168.1.2 Bcast:192.168.1.255 Mask:255.255.255.0 UP BROADCAST RUNNING MULTICAST MTU:1500 Metric:1 RX packets:5973506 errors:0 dropped:0 overruns:0 frame:0 TX packets:6265264 errors:0 dropped:0 overruns:0 carrier:0 collisions:1331 txqueuelen:100 RX bytes:557511152 (531.6 Mb) TX bytes:2810327518 (2680.1 Mb) Interrupt:10 Base address:0x6100 eth0:0
Link encap:Ethernet HWaddr
00:50:FC:22:9C:57
--- 192.168.1.2
ping statistics ---
--- 192.168.0.2
ping statistics ---
|
裝置設定檔設定多個 IP:
這個東西也不難!還記得我們在 連上 Internet 一文當中,曾經提到網路卡的參數設定檔吧!沒錯!那就是 /etc/sysconfig/network-scripts/ifcfg-eth0 囉!好了!那麼我們目前是以裝置 eth0:0 做為裝置代號,自然檔名就需要改一改啦!所以您可以這樣做一次,來達成與上面 command line 的設定相同的狀況!
| [root@test
root]# cd /etc/sysconfig/network-scripts
[root@test network-scripts]# cp ifcfg-eth0 ifcfg-eth0:0 請注意,那個 ifcfg 的檔名是必要的,而 eth0:0 則是裝置代號!所以請依您的需求來設定檔名!例如您要設定 eth0:1 ,則檔名應該寫為 ifcfg-eth0:1 才對呦! 1. 開始設定參數檔! [root@test network-scripts]# vi ifcfg-eth0:0 # This file is just to be used to test the more IPs DEVICE=eth0:0 <==這裡請跟剛剛檔名的地方寫的一樣!亦即為裝置代號! ONBOOT=no <==是否開機時啟動!由於與實體介面有關,所以,無論 這裡設定為何,開機只要啟動 eth0 ,則這裡就會被啟動! BOOTPROTO=static <==使用的開機設定協定 IPADDR=192.168.0.2 <==我設定的 IP! NETMASK=255.255.255.0 <==就是子網域遮罩 NETWORK=192.168.0.0 <==就是網域 BROADCAST=192.168.0.255 <==就是廣播位址啦! 2. 正確的啟動! [root@test network-scripts]# ifup eth0:0 [root@test network-scripts]# ifconfig eth0:0 eth0:0 Link encap:Ethernet HWaddr 00:50:FC:22:9C:57 inet addr:192.168.0.2 Bcast:192.168.0.255 Mask:255.255.255.0 UP BROADCAST RUNNING MULTICAST MTU:1500 Metric:1 Interrupt:10 Base address:0x6100 3. 正確的關閉! [root@test network-scripts]# ifdown eth0:0 |
需要注意的地方:
一般而言,鳥哥個人是比較偏向於『使用參數設定檔案的方式』來進行我的多個 IP 的設定!這樣有很多好處啦!包括我可以在 ifcfg-eth0:0 這個檔案裡頭,先以 # 註解符號後面來說明一下當初我為何要建置這個檔案,以及可以使用檔案的型態來瞭解一下我的設定檔,再來,由於所有的網路卡參數檔案都在這個目錄下『 /etc/sysconfig/network-scripts』,所以我可以很輕易的就找到相關的設定檔囉!所以,比較推薦這個方式!不過,以一張網路卡設定多個 IP 仍有需要特別留意的地方:
路由器 Router:
- 當您的公司成長到需要 200 部電腦好了,這個時候假如您還是將所有的 200 部電腦都給他在同一個網域之內,那麼當一部電腦要將資料丟出來的時候,嘿嘿!所有的網路卡將會停頓一下等他的物理廣播!這會造成相當大的網路負荷!此外,在 Hub 裡頭,所有的資料都在裡頭流竄,您會發現您的資料很容易有破損而無法連線的情況!這會造成內部網路的極大負荷....
- 那或許您會說:『如果 Hub 不行,那麼我將他換成 Switch 總可以了吧! Switch 不是可以將封包碰撞的機率降至最低嗎?』是的!您說的沒錯!但是很不幸的,您買的 Switch 應該是 10/100Mbps 的吧!果然如此的話,那麼您的 Switch 最大的即時傳輸量為 12.5 MBytes 左右,如果平均分配給您的 200 部電腦的話,那麼每一部的頻寬是多少?答案是 60 KBytes 左右!嘿!在區域網路內的電腦流量怎麼會這麼慢?!尤其當一個人死命的捉某部電腦的資料的時候,那就慘咯!其他人的平均頻寬將會降的更低!
- 當我有一個封包要送到 192.168.1.0/24 這個網域時,我的輸出介面為 eth0 這個介面;
- 當我有封包要送到 127.0.0.0/8 ( A Class ) 時,我的輸出介面為 lo 這個介面;
- 當我有資料要送到 140.116.142.253 時,由於他是 p-p-p 的協定,所以是單點對單點,而介面為 ppp0 這個;
- 至於其他沒有規定到的所有網域,則統一由 default 這個 Gateway 140.116.142.253 ,介面為 ppp0 丟出去!由於 ppp0 傳送到的這個 140.116.142.253 是 ISP 的介面,該介面通常為 Router ,所以他會自動的將您的封包再往前面送,使之最後可以到達目的地!
什麼是 Router ?
還記得我們在 網路基礎 裡面提過的幾個東西嗎?『不同網域的資料流,必需要透過 Router 來轉譯彼此』,也就是說,我們必需要藉由 router 來溝通不同的網域之間的資料啦!通常我們發現 router 的地方,都是在不同的網域之間相互連通的節點上面,好了,那麼我們也曉得 Router 是一個『很貴的機器』,呵呵!那麼 Linux 可以做成 router 嗎?嘿嘿!很好!他可以!
註:路由器與 IP 分享器(或者是 Linux 上面架設 Network Address Translation, NAT )是不太一樣的兩個咚咚,我們先不談很高貴的 Router 功能(因為功能太多了!可以轉譯的資料很嚇人,這裡我們不談這些!),單純的 Router 功能只是在溝通 Router 上面的兩個以上介面的資料傳輸,所以在不同網域的資料傳輸時,就需要透過 Router 了。不過,這裡特別再強調一下,公共 IP 與 私有 IP 是無法直接溝通的,所以萬一您的兩個介面分別是 Public IP與 Private IP 時,那麼簡易的 Router 就無法將這兩個介面的資料作溝通了!因為是兩種不一樣的 IP 嘛!這個時候就需要在 Router 上面啟用 NAT 功能了。NAT 技術可以將來自 Private IP 的資料封包中,將來源 ( 當然也可以修改目的 ) IP 修改成為 NAT 主機本身的 Public IP 來進行對 Internet 的傳送!所以, NAT 主機同時也是 Router ,此外,因為他具有將資料封包偽裝的功能,所以可以透過 NAT 主機來讓內部的 Private IP 偽裝後,來與 Internet 的 Public IP 來溝通!更多關於 NAT 的技術我們在後續的章節會再提及!
為何需要 Router ?
既然 Router 的作用是連通不同的網域,那麼我的公司所有的電腦只要都在同一個網域之內,那不就得了!根本就用不著 Router 嘛!不過,不要忘記了我們在 網路基礎裡面曾將向大家提過的『封包碰撞』與『節點的最大傳輸量』限制!舉個例子來說好了:
這個時候或許 Router 的功能就可以顯現出來囉!怎麼說呢?因為不同的網域之間不能直接進行資料的溝通,所以您必需要將網域分別開來,而假設以 200 部電腦平均分為 5 個網域好了,這個時候一個網域裡面只有 40 部電腦,在這個情況之下,不但佈線容易( 針對 40 部電腦來說 ),而且由於不同網域之間不會互相干擾,所以您的物理廣播或邏輯廣播時產生的網路停頓情況將會減少非常的多!如此一來,對於您內部區域網路的網路流量舒緩,將有相當大的助益!『請特別留意,通常比較大的區域網路( 指電腦數量較多的企業 ),如果規劃不良,則您對外連線的時候,最大的速度瓶頸可能來自於內部網域!這是因為內部網路的 loading 比起外部網路要『慢的很多!』因為內部網路互連的狀況( 例如網路芳鄰的資源分享、印表機的分享、檔案伺服器的分享等等 )就會導致您的 Switch/Hub 的頻寬被佔用光了!』
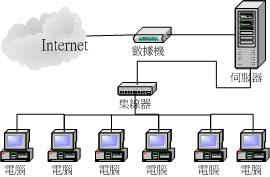
一般不想要管事的網管人員,最喜歡直接將佈線設計成類似底下的模樣:

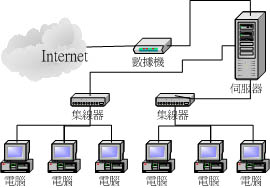
這樣做最大的好處就是『簡單』,您只要控管一個 伺服器 就夠了!其他的完全不用去理他,管他什麼封包碰撞,反正您內部網路的 loading 太大也沒有關係,對於懶惰的網管人員來說,他根本就不痛不癢....這個時候您的內部網路的流量可能真的會負荷很大啦!此時,相當的建議設定成類似底下的模樣!

觀察與修改路由:
其實就如同前面說的, Router 的最大用途就是將不同網域的資料互相流通,而要溝通這些資料,必然就需要有所謂的『路由, route』這個東西了!以我的情況為例,我是以 ADSL 撥接上 Internet 的,但是我有個內部網域,192.168.1.0/24 這一個內部網域存在,所以在我的 Linux 底下輸入 route 時,會得到如下的結果:
| [root@test
root]# route
Kernel IP routing table Destination Gateway Genmask Flags Metric Ref Use Iface 140.116.142.253 * 255.255.255.255 UH 0 0 0 ppp0 192.168.1.0 * 255.255.255.0 U 0 0 0 eth0 127.0.0.0 * 255.0.0.0 U 0 0 0 lo default 140.116.142.253 0.0.0.0 UG 0 0 0 ppp0 |
這樣瞭解了嗎?那個 default 裡頭的 Gateway 可能取得的方法很多,例如撥接後來自 ISP 的參數、在 /etc/sysconfig/network-sysconfig/ifcfg-ethn 這個檔案裡面的設定參數,以 Cable Modem 連接 ISP 後所取得的網路參數等等。OK!那麼假設您的網域當中還有另外一個不同的網域,假設為 192.168.0.0/24 好了,而這個網域同樣的是接在 eth0 這個網卡上面,所以您要您的 eth0 同時還負責 192.168.0.0/24 這個網域時,可以這樣做!
| [root@test
root]# route add -net 192.168.0.0 netmask
255.255.255.0 dev eth0
[root@test root]# route Kernel IP routing table Destination Gateway Genmask Flags Metric Ref Use Iface 140.116.142.253 * 255.255.255.255 UH 0 0 0 ppp0 192.168.1.0 * 255.255.255.0 U 0 0 0 eth0 192.168.0.0 * 255.255.255.0 U 0 0 0 eth0 127.0.0.0 * 255.0.0.0 U 0 0 0 lo default 140.116.142.253 0.0.0.0 UG 0 0 0 ppp0 [root@test root]# route del -net 192.168.0.0 netmask 255.255.255.0 dev eth0 |
- 註:請特別留意,當您使用 route 來秀出目前的路由表時,如果顯示的訊息非常的緩慢,不要懷疑!一定有地方設定錯誤。請依照
route 所顯示的訊息來修改您的網路參數!通常最容易發生 route 問題的地方在於
gateway 的設定啦!或者是重複啟動多次的虛擬介面時,也會有這樣的情況,例如我曾經看過在
route table 上面出現同一個路由狀態共三次以上!例如上面 192.168.0.0 ....
那一行,若在 route table 上面竟然重複出現三次!這肯定有問題呀!!處理的方法為:
- 將該相關的網路介面關閉!使用 ifdown 來關掉;
- 使用 route 的功能,將該路由刪除!
- 修改相關的介面,將介面符合我們的需求!
- 重新啟動介面,並持續觀察 route !
一個 Router 架設範例:
- 好啦!既然知道 Router 的好處之後,再來當然就是要來架設他囉!其實架設的方法真的很簡單!您只要作幾個動作就可以啦!(註:請特別留意,本文僅在測試
Routing 的功能而已,如果您在貴公司內部需要架設 Router 時,可以依照本文的概念來架設,但是實體佈線則需要用『實體網路卡』來區隔,請不要使用本文的
IP Alias 的方式!切記!)
- 設定網路卡,使連接不同的網域;
- 設定 route 路由表,讓兩網域可以互通;
- 啟動 ip_forward 的選項;
- 在 Client 端設定 gateway 分別為 server 端的兩個 IP !
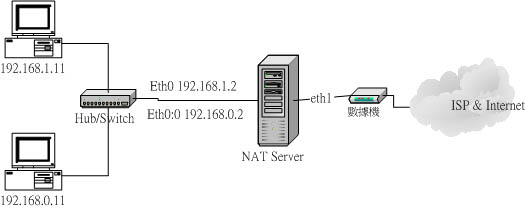
- Linux 主機:我的 Linux 伺服器本身未來亦作為 NAT 之用,裡面有兩張網路卡,一張連接 ADSL 數據機,這張對外卡的代號為 eth1 ,一張連接內部網路,代號為 eth0 ;
- Hub 連結電腦:Linux 主機對內的網路卡 eth0 連接到 Hub 上面,同時,Hub 上面還存在其他四部個人電腦,取兩部來進行測試, IP 分別為 192.168.1.11 及 192.168.0.11 ;
- eth0 對內網路卡:由於對內有兩個 C Class 的網域,所以我的網路卡 eth0 設定為 192.168.1.2 而另一個虛擬介面 eth0:0 設定為 192.168.0.2 !
- Client 端的作業系統:我的 client 端的設定方面,在 192.168.1.11 使用 Windows 2000 隨機版,而 192.168.0.11 則使用 Red Hat 7.3 這個咚咚囉!
- 在 192.168.1.11 這個 client 端,先連線到 192.168.1.2 試看看能否連線;
- 在 192.168.1.11 這個 client 端測試是否可以連線到 192.168.0.2 這個 Server 端的另一個網路連接介面;
- 在 192.168.1.11 這個 client 端測試是否可以連接到另一個 client 端,亦即 192.168.0.11 這個 client !?
- 將 Linux 主機的 /proc/sys/net/ipv4/ip_forward 功能關掉,然後再檢驗上面的三個步驟看看!試看看網路是否能夠溝通呢?
由於我們的 Router 需要直接跟兩個網域互相連通,所以囉,您的 Router 上面就需要同時具有在這兩個網域之間的 IP 啦!此外,由於不同的網域需要啟動 Routing 的功能!所以您必須要做一個動作,那就是讓目前 Linux 系統裡面的 Routing 功能啟動!那麼我們在 鳥哥的 Linux 私房菜 -- 基礎學習篇之資源管理 的文章裡面曾經提過,那個核心的程序都是記錄在 /proc裡面的,至於我們 Linux 核心的網路功能則都記錄在 /proc/sys/net/ipv4 這個目錄內!而啟動 Routing 的程序為 ip_forward 這個檔案!只要將內容設定為 1 即為啟動,而當為 0 時,就是關閉的啦!因此,若要啟動 Routing 則需要『 echo 1 > /proc/sys/net/ipv4/if_forward 』即可!底下是我的測試環境啦!請注意,這個範例單純僅只是在測試 Router 的功能罷了!您應該依照您的需求來架設您的 Router 呦!那麼就將我的連線圖示秀出來囉! ^_^
測試環境說明:
在我的實際測試環境當中,每個元件的內容如下:
基本的圖示如下示意:

在這個章節當中,我們不談怎麼架設 NAT 主機,那個是後續章節才要提到的東西,所以焦點的地方在於 NAT Server 的左邊之設定,也就是 eth0 的設定!亦即是內部網域的設定而已!基本上,這個可以視為 區域網路架構 那一篇文章的內容延伸啦!在這個地方,我們的網路卡有兩個 IP 呦!
開始設定:
我們就照著上面的步驟一步一步做來吧!
| 1. 設定網路介面,其中
eth0 為 192.168.1.2, eth0:0 為 192.168.0.2
[root@test root]# cd /etc/sysconfig/network-scripts [root@test network-scripts]# vi ifcfg-eth0 DEVICE=eth0 ONBOOT=yes BOOTPROTO=static IPADDR=192.168.1.2 NETMASK=255.255.255.0 NETWORK=192.168.1.0 BROADCAST=192.168.1.255 GATEWAY=192.168.1.2 [root@test network-scripts]#
vi
ifcfg-eth0:0
[root@test network-scripts]#
ifup
eth0 ; ifup eth0:0
eth0:0
Link encap:Ethernet HWaddr 00:50:FC:22:9C:57
2. 觀察路由情況:
3. 啟動 IP FORWARD
項目:
4.1 設定 192.168.1.0
那個網域的 client 電腦:
4.2 設定 192.168.0.0
那個網域的 Client 電腦
|
另外,請特別留意,就如同剛剛前面我們提過的資訊來看,開機的時候,不論您的 alias 的設定為何 ( 是否設定為 ONBOOT ),只要啟動 eth0 則相關的 eth0:n 都會被啟動!這個時候請特別留意!如果其中有一個 IP alias 設定錯誤的話,那麼可能將會導致您的網路整體都會不通!原因多半出在 GATEWAY 上面!建議設定完成之後,先將 eth0 整個 shutdown ,然後再啟動,亦即『ifdown eth0; ifup eth0』然後再來看看 route 的情況!這樣可以避免這次設定成功,下次開機卻是不通的情況發生的!
測試 Router 工作:
好了,不可免俗的,我們可要好好的測試一下我們的 router 囉!如何測試呢?很簡單呀!
測試的工作就是這麼簡單!來吧我們來測試看看吧!
| 1. Client 端的測試(
Windows 2000 作業系統, IP 為 192.168.1.11 ):
C:\>ping 192.168.1.2 <==同網域的主機 Pinging 192.168.1.2 with 32 bytes of data: Reply from 192.168.1.2: bytes=32 time<10ms TTL=255 Reply from 192.168.1.2: bytes=32 time<10ms TTL=255 Reply from 192.168.1.2: bytes=32 time<10ms TTL=255 Reply from 192.168.1.2: bytes=32 time<10ms TTL=255 Ping statistics for 192.168.1.2: Packets: Sent = 4, Received = 4, Lost = 0 (0% loss), Approximate round trip times in milli-seconds: Minimum = 0ms, Maximum = 0ms, Average = 0ms C:\>ping
192.168.0.2
<==不同網域的主機
C:\>ping
192.168.0.11
<==不同網域的 Client 端!
2. Server 端的修改:
3. Client 端的測試
( 作業系統為 windows 2000, IP 192.168.1.11 ):
4. 恢復 Linux
Router :
5. 用另一部
Linux 主機看一下結果 ( IP 192.168.0.11 ):
|
建議:
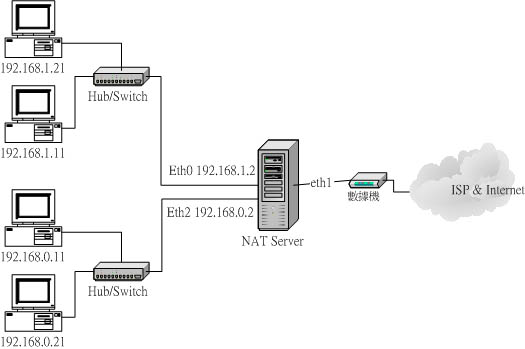
上面的那個範例單純只是為了作為範例來示範!要注意,我們在公司內部架設 router 的時候,通常是希望降低內部網路流量的負載,這個時候,當然是將兩個網域分別分開在兩個實體網路卡上面比較好!而不是在一塊網路卡上面設定兩組 IP ,這樣做對於減低流量負荷的幫助應該不大!所以,您的實體線路配線方面可能要變成如下圖所示的模樣( 當然,設定方面則是完全一樣啦! ):

無論如何,上面的方式可以提供一些中小企業,電腦數要多不多,偏偏又會影響整體流量的情況時,可以使用來解決問題!再來,對於中小學的網路佈線情況呢,也可以達到不錯的降低整體網路負荷的效果!而這個簡單的 Router 您可以使用 486 那種等級的舊舊的電腦來架設就可以啦!反正他的 loading 又不重~~此外,附上一篇小州前輩的建議給大家參考:
其實這樣子弄是有點問題的。我的意思是說,一般弄切割的話,還是需要弄獨立的網路卡分隔,這不只是區隔網路而已,而且還是考慮到實體封包流通時的問題。
您網頁上的架構,實體網路佈線,那 linux 只有一張網路卡,所以網路卡接網路線時會接到 hub 上,而 a、b 兩端不同網路區段的電腦也都是把網路線接到該 hub。這個佈線方式,其實底層封包流通時,a、b 兩端網路都還是可以收到,只不過 ip 那層看到因為不是自己網路區段的封包而不理會。
ip alias 時機,一般不建議用在提供 router/nat 這類同一個 ip 區段內,因為不同網路區段的封包還是會撞在一起... 真正商業使用上,要提供router/nat 功能時,通常不會建議使用 ip alias (除非真的是臨時需要或者是真的少網路卡可以用),而會使用兩張網路卡並且各自使用 hub/switch切割開處理。
另外以管理實際網路的經驗來看,其實若是有使用者作怪,像是 a 網路有人架設dhcp,那 b 網路使用者可能就遭殃了:Q 還有就是,若是 a 網路內的電腦作怪,也可以把自己的 ip 設定為 b 網路區段內的 ip,那就會失去區隔效用。
重點回顧:
- 網路卡的代號為 eth0, eth1, eth2...,而第一張網路卡的第一個虛擬介面為 eth0:0 ....。
- 可以直接使用 ifconfig 來設定網路參數,也可以使用編輯檔案,檔案在 /etc/sysconfig/network-scripts/ifcfg-ethn[:m],其中 n 與 m 為數字;
- Linux 要作為 Router 時,務必啟動 ip_forward;
- Router 上面應該具有兩個以上的網路介面,以溝通不同的網域封包資料;
- 使用 route 指令來設定 Router 的路由表。
- 事實上,Router 除了作為路由轉換之外,在 Router 上面架設防火牆,亦可在企業內部再分隔出多個需要安全 (Security) 的單位資料的區隔!
課後練習
- 請問您如何將您的 eth0 這個介面修改成為 192.168.100.2 在網域 192.168.100.0/25 之內的網路參數內容?
- 請手動設定 eth0:1 這個虛擬介面,使成為網路參數: 192.168.200.2, 網域在 192.168.200.0/24。
- 如何觀察路由表?
- 如何啟動 Linux 的 IP Forward 功能?
- 假設您是一個學校單位的資訊管理員,學校內有 200 部電腦,奉上面大頭的旨意,必須要將 200 部電腦分為 4 個 Subnet ,請問您應該如何佈線(請畫出示意圖)?而這 4 個 Subnet 的網路參數如何選擇(請自行選擇)?而是否需要 Router ?如果需要的話,假設每個 Router 僅能有兩個網路實體介面,那麼該如何佈線?(註:不要使用虛擬介面)
- 萬一您的網路有點停頓,發現可能是網路上某個節點出現問題,您應該如何確認是哪一部 Router 出問題?
前往參考用解答
2002/08/09:第一次完成日期!
2003/08/22:重新編輯文章,並增加重點回顧與課後練習

