最近更新時間: 2003/08/26
為何需要主機名稱
:主機名稱的由來
:關於 DNS 的查詢流程
:重點在合法授權
:申請靜態還是動態 DNS 主機名稱
註冊一個合法的主機名稱 :
:靜態 DNS 的申請
:動態 DNS -- http://www.adsldns.org
:動態 DNS -- http://www.no-ip.com
參考資料
課後練習
為何需要主機名稱:
- 說到這個『為什麼需要主機名稱』的問題,呵呵!其實還真的是為了人類那容納不下太多記憶體的腦袋啊!因為人們對於網路基礎的
IP 記憶力實在是不好,所以才會選擇以人類容易記憶的『Hostname』來作為記憶某部主機的位址。不過,因為網路僅認識
IP 而已,而人類僅想要記憶主機名稱而已,所以囉,人們就得想一個辦法『將主機名稱與
IP 對應在一起』才行啊!如果您想要架設一個在 Internet 上面提供服務的網站時,那麼一個容易記憶與閃亮的主機名稱是必須的喔!否則大家要連上您的網站都得要記憶
IP ,那不煩死了~而且,如果您的 IP 又是類似撥接的不固定的 IP 時,那還更傷腦筋呢!所以,在這個章節裡面,我們會針對如何申請一個合法的主機名稱來做說明,至於您如果想要進行領域名稱(
DNS )主機的架設,那就請參考後續章節的 DNS 主機設定吧!
- 先查看本身有沒有紀錄:因為 hinet 並沒有紀錄到學術網路上面的資訊,所以自然也就沒有辦法直接提供給 client 端關於 aerosol.ev.ncku.edu.tw 這部機器的 IP 了,好了,這個時候 168.95.1.1 就會向 DNS 的 root 『.』 那部主機查詢,而 『.』 會告訴 Hinet 到 .tw 這部機器去查詢;
- 向最頂層查詢:由於 168.95.1.1 沒有紀錄我們主機的 IP ,這個時候他就會向『台灣地區最頂層的 DNS 』亦即 .tw 這部主機來查詢資料了!而.tw 這部機器管理的只有 .com.tw, .edu.tw ... 等等的那一行的幾部主機的 IP 而已(見圖一),所以他也不曉得 aerosol 那部主機的 IP ,但是他卻可以告訴 168.95.1.1 說『嘿!您可以到 .edu.tw 那部機器去查詢!我這裡有 .edu.tw 的 IP 呦!』;
- 向第二層查詢:168.95.1.1 接著又到 .edu.tw 去查詢,而該部機器管理的又僅有 .ncku.edu.tw, .nsysu.edu.tw, .... 那幾部主機(見圖一),所以這個時候 .edu.tw 又告訴 168.95.1.1 說:『您要去 .ncku.edu.tw 那裡查詢,我有他的 IP !』;
- 向下層持續查詢:好了,一步一步下來, .ncku.edu.tw 可以查到 .ev.ncku.edu.tw 的 IP ,而最後我們 aerosol.ev.ncku.edu.tw 就可在 .ev.ncku.edu.tw 當中查詢到啦!
- 記錄暫存記憶體:查到了 IP 之後, 168.95.1.1 會先記錄一份對應 IP 的資訊在自己的暫存記憶體當中,以方便下一次同一個主機名稱的要求之查詢!然後再將結果回報給 client 端!
- Client 端(就是您啦)每次開機或者是重新撥接,並取得一個新的 IP 之後,會向 DNS Server 端提出要求,希望 Server 端變更主機名稱與 IP 的對應 ( 這個步驟在每個主要的 ISP 都有提供適當的 program 來提供給 client 使用 );
- Server 端接受 Client 端的要求之後,會先去查詢 Client 提供的帳號密碼是否正確,正確之後就會立即修改 Server 本身對於您的主機名稱的設定值。
- 如果您的主機具有固定 IP 時,請選擇預設的固定 IP 對應主機名稱,並且只要在 DNS 主機上面設定過一次之後,就不需要進行其他的設定,您的主機名稱就已經可以被查詢到了;
- 如果您的主機 IP 是非固定的,那麼就得使用動態 DNS 系統所提供的領域名稱伺服器系統,才可以隨時更新您的主機名稱對應的 IP 喔!
主機名稱的由來
在早期,因為連上網路的電腦數量不多,不過因為 IP 很難記憶,所以在網路上的人們就想出一個簡單的辦法來進行主機名稱與 IP 的對應,那就是『在每部電腦的 /etc/hosts 裡面設定好主機名稱與 IP 的對應表』,那麼未來人們就可以直接藉由主機名稱來連接上某些網路上的主機囉!然而因為科技的發達,連上 Internet 的人們越來越多,使用 /etc/hosts 的方法已經搞不定了(只要一部電腦上線,全部的 Internet 上面的所有電腦都要重新改寫 /etc/hosts!不太好吧! ) ,這個時候領域名稱系統 ( Domain Name System, DNS ) 就適時的出現了!
DNS 利用類似樹狀目錄的型態,將主機名稱的管理分配在不同層級的 DNS 主機當中,經由分層管理,所以每一部主機的記憶的資訊就不會很多,而且異動上面也相當的容易修改!那麼這個 DNS 的功能您知道了嗎?對啦!就是『將電腦主機的名稱轉譯成 IP 』就是了!當然囉,他的額外功能還很多,關於 DNS 的詳細的解析部分我們將在後續的 DNS 主機架設 章節當中在持續的加強內容,總之,他的最大功能就是『讓有意義的,人類較容易記憶的主機名稱(英文字母),轉譯成為電腦所熟悉的 IP 位址!』舉個例子來說好了,奇摩雅虎的網站的 IP 是 202.1.237.21 ,所以您可以在您的瀏覽器上面輸入『 http://202.1.237.21 』來連上奇摩雅虎!不過,我想沒有幾個人能夠將這個 IP 背的起來的吧?!反之,我們卻都知道奇摩雅虎的網址為 tw.yahoo.com ,那麼您只要輸入『 http://tw.yahoo.com 』就可以連上 Internet 啦!很容易記憶吧!不過,電腦怎麼知道 tw.yahoo.com 就是 202.1.237.21 呢?底下我們以我們的主機 aerosol.ev.ncku.edu.tw 來說明 DNS 的搜尋原理吧!
關於 DNS 的查詢流程
剛剛說過 DNS 是以類似『樹狀目錄』的型態來進行名稱的管理的!所以每一部 DNS 主機都『僅管理下一層 DNS 主機的名稱轉譯』而已,至於下層的下層,則『授權』給下層的 DNS 主機來管理啦!這樣說好像很繞口,好吧!我們就以下圖來說一說原理囉:
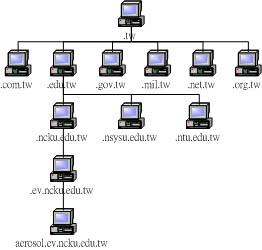
圖一、DNS 的查詢示意圖
就是這樣的分層負責,所以當您的主機名稱要修改時,您只要向您的上層 DNS 要求修改,那麼全世界就都可以找到您修改過後的主機名稱對應的 IP 了!很簡單維護吧!機動性也很高吧!好啦!那麼我們需要架設 DNS 了嗎?!哈哈!當然不是,為什麼呢?這個就牽涉到『授權』的問題了!
重點在合法授權:
很多朋友都認為『我要架站,因為主機要有名字,所以一定需要架設 DNS ?』是這樣嗎?當然不是!這是錯誤的觀念,怎麼說呢?從上面的圖示當中,您應該不難發現,當我要搜尋 aerosol.ev.ncku.edu.tw 時,就需要由 .ev.ncku.edu.tw 這部機器上面查到,而 .ev.ncku.edu.tw 則需要在 .ncku.edu.tw 上面查到!好了,那麼 .ncku.edu.tw 怎麼知道 .ev.ncku.edu.tw 的 IP 呢?這是因為『 .ncku.edu.tw 已經授權給 ev.ncku.edu.tw 這部機器,當有人要查詢 .ev.ncku.edu.tw 時, .ncku.edu.tw 將把查詢的任務直接轉給 .ev.ncku.edu.tw 去管理了!』所以囉,如果您要架設 DNS ,而且是可以連上 Internet 上面的 DNS 時,您就必須要透過『上層 DNS 主機的授權』才行!
那麼我要怎麼架站呢?很簡單阿!剛剛不是說過嗎? DNS 系統最大的功能就是『主機名稱轉譯成 IP 』這個動作,那麼您只要向任何一個合法的 DNS 主機申請一個『主機名稱, hostname 』給您的 Linux 主機,讓大家都可以藉由該 DNS 主機來查詢到您的 Linux 之 IP ,就可以使用該主機名稱來架站啦!就是這麼簡單!那網址列的名稱有沒有什麼意義呢?其實是有的,網址列的最後幾個字母代表的意義如下:
|
|
|
|
|
|
|
|
|
|
|
|
|
|
|
|
|
|
|
|
|
所以囉,如果您只是想要『一個合法的主機名稱』,那麼根本就不需要架設 DNS 主機,只要去申請一個合法的名稱即可喔!那麼該如何申請呢?又,如果我的 IP 不是固定的,又該如何使用呢!?
申請靜態還是動態 DNS 主機名稱
由上面的說明當中,我們可以很清楚的知道 DNS 系統最大的功能就是在主機名稱對應 IP 的轉譯上面。當然啦,預設的 DNS 轉譯是用在『固定 IP 對應主機名稱』的方法上面的!夭壽喔!我們的小站很多都是以非固定 IP (很多人也稱為浮動式 IP 、動態 IP 等等的名稱) 來上網的,更有甚者, Hinet 的 ADSL 撥接都是 24 小時強制斷線一次的,所以我們都得需要重新撥接上網,而每次撥接成功後取得的 IP 可不見得相同啊,如此一來 IP 不是一直在變嗎?!那麼我不就需要一直跟我上層 DNS 主機的管理員申請『變更 IP 』嗎?!會不會太麻煩了點?
是很麻煩啊!所以現在為了解決這個問題,很多 ISP 提供了所謂的 動態 DNS 主機服務 的功能,他是這樣做的:
所以囉,每次我們取得了新的 IP 之後,我們的主機名稱對應的 IP 也會跟著在 DNS 系統上面更新,如此一來,只要別人知道您的主機名稱,不論您的 IP 為何,他一定可以連上您的主機 ( 因為 IP 跟著您的主機而變! ) 這對於我們這種使用動態 IP 的人是很有幫助的! ( 阿!真是造福我們這些窮苦人家的孩子呀!)
就因為如此,所以:
不過,還是需要注意的,目前的主機名稱申請很多是『需要錢的』!如果您需要比較穩定的主機名稱對應 IP 的服務,那麼花點錢來註冊還是必須的,不過,如果是實驗性質的網站,那麼也是可以申請免費的動態 DNS 系統喔!
註冊一個合法的主機名稱
:- 靜態 DNS 主機註冊:
- 台灣網路資訊中心:http://www.twnic.net/index3.php
- 國外的領域名稱系統:http://www.netsol.com/
- 國外的領域名稱系統:http://www.dotster.com/
- 荻恩斯科技:http://kevin.adsldns.org/
- 台灣地區免費動態DNS系統(中文):http://www.adsldns.org
- 國外的免費 DNS 系統:http://www.no-ip.com
- 先查詢所想要註冊的網域是否存在;
- 進入 ISP 去申請註冊您所想要的主機名稱;
- 繳費,並等待主機名稱被啟用。
- 進入主畫面:
- 逐步進行註冊:
- 填寫主機名稱對應的 IP:
- 等待 DNS 啟用:
- 僅 e-mail 給管理員:
- E-mail 之外,還會更新 DNS 組態:
- 在 IP 分享器後端的 Linux 來更新 DNS 的 IP :
- 登入主網頁:
- 填寫主要的識別資料:
- 登入 no-ip :
- 註冊使用新的 HOSTNAME 去:
好了!既然知道了 DNS 的用途,那麼自然我們就需要來申請 DNS 啦!不然怎麼架設網站呢?目前的靜態 IP 對應主機名稱的註冊網站有底下幾個!當然還不止啦!我們僅提出幾個出來分享就是了!
動態 DNS 主機註冊:
那麼有沒有免費的 DNS 系統呀!呵呵!當然有囉!我們要感謝造福我們這些窮苦人家的孩子的大好人~~您可以在底下找到相關的資訊:
靜態 DNS 的申請
靜態 DNS 的申請方式其實都差不多,都是需要:
我們以台灣蠻常見的 Hinet 這個 ISP 提供的『個人網域, .idv.tw』註冊方式來說明:
直接連結到底下的網頁去:http://nweb.hinet.net/,並在 whois 的畫面當中(右上角)選擇您想要註冊的主機名稱吧!

如果確認您的主機名稱沒有被註冊掉,那麼您就可以開始註冊了!同樣的在上面的網站連結當中,選擇『個人網域名稱』就可以開始申請了!請依序一步一步辦理!這裡不再說明了,反正都是中文,看的懂得啦! ^_^

事實上,所有的註冊過程當中,最麻煩的要算是繳費了~您必須要等到繳費並且經過身份確認之後,才能夠進行底下的其他步驟啊!所以.....立刻去繳費用吧!
繳費完畢之後,我們就可以開始進行主機名稱的填寫了!按下上面圖示『DNS 指定/異動』的項目,並填入您的主機名稱與密碼,然後就會出現如下的畫面了:
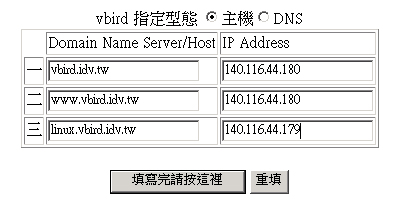
特別的給他留意,因為我們沒有要架設 DNS 主機(因為沒有必要啊!難度太高了!),所以當然最上方要選擇『主機』的項目,然後您可以填入三部主機名稱喔!當然,這三部主機名稱可以通通指向同一個 IP ,也可以不同!隨您的便吶!而,需要注意到的是,您的主機名稱應該是『othername.yourhost.idv.tw』後面的 yourhost.idv.tw 是不變的,前面的 othername 則可以自由選取呢!例如我上面的設定,後面均是 vbird.idv.tw ,而前面的名稱就可以讓我自由選擇啦!
設定成功到可以使用,其實需要一定的時間的,以我為例,第一次申請之後,大約過了 20 小時該設定才正確的啟動呢!請以請耐心等候啊!不要太著急囉! ^_^
動態 DNS -- http://www.adsldns.org
如果您想要使用免費的 DNS 系統,而且您的 IP 又是非固定的,那麼在台灣地區的 www.adsldns.org 倒是真的挺適合您的!您可以在 http://www.adsldns.org/member.php 申請註冊,裡面都是中文,所以我就不捉圖了,您可以自行填寫完成的啦!填寫完成之後,按下註冊,就可以申請到您的主機名稱了!不過,重點在後面,在您取得了帳號與密碼之後,接下來需要設定『到底要使用動態 DNS 還是靜態 DNS 系統』的選項,所以,請您登入到首頁: http://www.adsldns.org/service.php,在左上方填寫您的註冊時填入的 email 以及密碼,就可以進入到如下畫面:
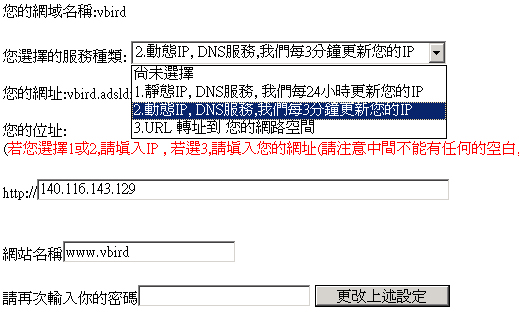
因為我們想要進行的是動態 DNS 的設定,所以在填寫了 IP 之後,還需要選擇第 2 項的服務功能才行喔!千萬記得吶!好了,那麼要如何讓系統自動的在取得新的 IP 之後立即更新主機名稱呢?!在這裡我寫了一個針對 www.adsldns.org 的偵測 scripts 來使用,您應該先要瞭解一下我是如何設計這個 script 的,當您的 Linux 取得了新的 IP 之後,我這個 script 會依據您的設定而有三個工作項目,分別是:
適用的環境:沒有申請 www.adsldns.org 的主機名稱;
功能:不會更新 DNS ,僅會將新的 IP e-mail 給系統管理員。
原理:利用簡單的 IP 分析,如果新的 IP 分析出來的結果是沒有連線的,那麼系統將先啟動 Internet 連線,如果舊的 IP 與新的 IP 不一樣,那麼就將新的 IP 寄給系統管理員!
適用環境:申請 www.adsldns.org 主機名稱者;
功能:除了新的 IP 將 e-mail 給系統管理員之外,亦將會分析 DNS 主機的 IP 。
原理:利用 IP 分析,若發現斷線,則自動加以連線,而連線之後的 IP 除了 e-mail 給系統管理原之外,亦將與 Internet 上面的主機名稱 IP 比對,若不相同,則直接予以更新 DNS 的 IP !
適用環境:在 IP 分享器的後端的 Linux 主機,可用來判斷 IP 分享器的 IP
功能:除了判斷 IP 分享器的 IP ,並將 IP mail 給系統管理原之外,亦將更新 DNS 的 IP ;
原理:利用 www.adsldns.org 可以判斷自己的 IP 的原理,用來將該 IP 整個的更新!
上述的功能我將他全部都寫在同一個 script 裡面了,您必須要選擇您所需要的環境,而這個 script 將可同時適用 ADSL 與 Cable 的浮動式 IP 的狀態!一般來說,都是選擇 job 2 的啦!底下就是我這個 script 的內容,參考看看:
| #!/bin/bash
# # History and lastlog #====================================================================== # Date Who What #====================================================================== # 2002/08/05 VBird Use the older scripts to modify and adding some # modules to fit everyone's needed. # 2002/11/14 VBird delet the integer type declare! # 2003/08/26 VBird 加入 iptables.rule 的支援! # 重新改寫成 function 的模式! ####################################################################### #====================== INPUT SESSION ================================= # 1. 請輸入您在 http://www.adsldns.org 申請到的帳號密碼與主機名稱 password="your.password" email="your.email" hostname="your.host.name" # 2. method
部份請輸入您連接上 Internet 的方法, 有 adsl 與 cable 兩種
# 3. 這裡請輸入您要系統幫您寄信出去的
E-Mail
# 4. 您放置此程式的目錄
# 5. What jobs
is your needed?
#######################################################################
# 2. Detect
the old IP file
#######################################################################
# 底下這個函數在檢驗新舊
IP 是否相同!?
# 這個函數在將
IP 位址寄給您
# 這個函數在更新
DNS 系統
# 這個函數在更新防火牆機制
# 這個函數取得您的
DNS 主機名與 IP 是否相同!
#
# 2. compare with older IP and newer IP. And e-mail to you
#======================
EMAIL and UPDATE SESSION job 2 ================
# 2. compare with older IP and newer IP. And e-mail to you
# 3. check if the DNS name == newip
#======================
SHARE IP MECHANIME job 3 ======================
# 2. compare with older IP and newer IP. And e-mail to you
# 3. check if the DNS name == newip
|
上面的 script 您可以在 http://linux.vbird.org/download/index.php#ping_net_card 下載,至於安裝的方法就相當的簡單啦!您只要下載該 script ,然後將他移動到適當的目錄之下,修改一下上面顯示粗體字的地方,然後再修改您的 /etc/crontab !嘿嘿!那就成功囉!
| 1. 下載 script
並移動到適當的目錄:
[root@test root]# wget http://linux.vbird.org/download/vbird/ping_net_card.sh [root@test root]# mkdir -p /usr/local/pingcard [root@test root]# cp ping_net_card.sh /usr/local/pingcard [root@test root]# chmod 744 /usr/local/pingcard/ping_net_card.sh [root@test root]# vi /usr/local/pingcard/ping_net_card.sh # 這個時候進入 vi 的畫面,請依照您的需求來修改 INPUT 的部分! 2. 修改 crontab [root@test root]# vi /etc/crontab # ....新增加一行: */3 * * * * root /usr/local/pingcard/ping_net_card.sh |
嘿嘿!這樣一來,如果您的主機不正常的斷電之後,在三分鐘之內就會自動的撥接,此外,還會自動的上網去更新您的 DNS 主機名稱!還會 e-mail 到您的信箱去!告訴您最新的 IP 是什麼!哈哈!簡不簡單呀!? ( 註:因為我沒有 cable modem ,所以在 cable 的部分我是經由網友回報而做成的 script !此外,我也沒有 IP 分享器!所以第三個 jobs=3 還沒有測試過!無論如何, jobs=1 是完全沒有問題的!此外,針對朋友們常常發生的 lynx 沒有安裝的問題,這是我也先將他寫了一個小小的檢查檔案,可以告訴朋友們!嘿!您的 lynx 安裝了沒?! )
動態 DNS -- http://www.no-ip.com
除了 www.adsldns.org 之外,我們還有其他的選擇,那就是 no-ip 這家公司所提供的免費動態 DNS 系統啦!申請的方法如下:
在如下的圖示當中,因為我們要註冊一個新的網域,所以就給他選擇如下的『Sign-up-Free!』那一項:

因為 no-ip 會發給您一份密碼,所以在出現的如下畫面中,您必須要填寫『一個可以收到郵件的合法 Email 』,以及您的身份確認資料,這很重要,因為後續的資料都是使用您註冊時的這個咚咚吶!然後再按下最底下的『SIGN UP NOW』即可!
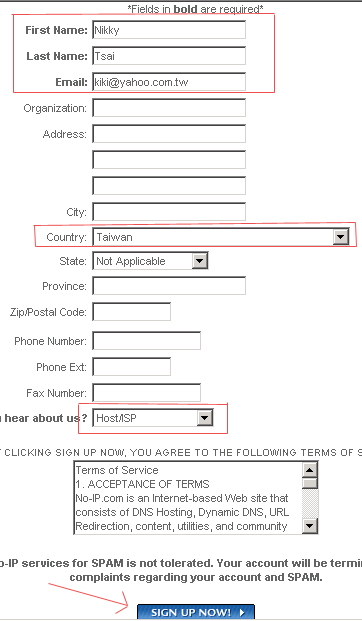
按下 SIGN UP NOW 而且出現如下畫面,就是已經註冊成功啦!
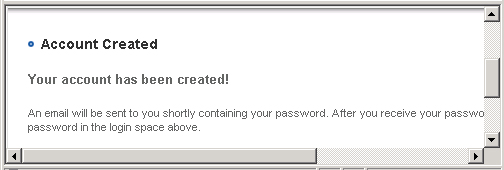
這個時候,請立刻以剛剛註冊用的 email 來收信,應該就會收到來自 no-ip 公司的密碼確認信,請記取上面的密碼,我們準備要來登入了!
用我們剛剛註冊時的 Email 以及 密碼 來登入 no-ip 了!

正確的登入之後會在畫面左手邊出現如下的圖樣:

好了,同樣的來設定一下我們所需要的主機名稱吧!在上面的圖示當中,請按下『Add』來新增我們的主機名稱:
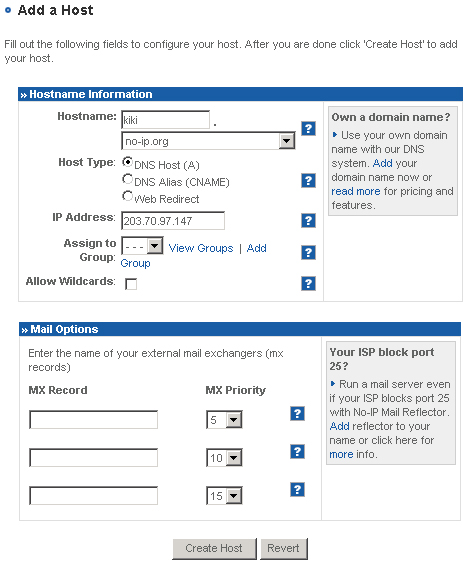
注意一下,您只要填入 Hostname, Host Type, IP Address 即可!至於那個 MX Record 等到未來談到 Mail Server 時,您再來選填吧!填完了三個資訊之後,直接給他按下『Create Host』即可!這樣就可以新增一個主機名稱了!如果您還想要瞭解其他功能的話,可以在步驟三的地方按下『Manage』就能夠刪除、編輯您的 no-ip 主機名稱咯! ^_^
| 0. 下載檔案:
[root@test root]# wget http://www.no-ip.com/client/linux/noip-2.0.12.tar.gz # 或者到鳥哥的網站下載 [root@test root]# wget http://linux.vbird.org/download/linux_server/noip-2.0.12.tar.gz 1. 解壓縮並且編譯及安裝 [root@test root]# cd /usr/local/src [root@test src]# tar -zxvf /root/noip-2.0.12.tar.gz [root@test src]# cd noip-2.0.12 # 注意一下,這個目錄裡面有個檔名為 README.FIRST 的檔案,請務必察看一下內容! [root@test noip-2.0.12]# make && make install # 這樣會將主程式安裝在 /usr/local/bin/noip2 而主參數檔放在 # /usr/local/etc/no-ip2.conf 當中! Auto configuration for Linux client of no-ip.com. Multiple network devices have been detected. Please select the Internet interface from this list. By typing the number associated with it. 0 eth0 1 ppp0 1 <==這裡請輸入您是使用那一個介面連接到 Internet 的? Please enter the login/email string for no-ip.com kiki@yahoo.com.tw Please enter the password for user 'kiki@yahoo.com.tw' ************ Only one host [kiki.no-ip.org] is registered to this account. It will be used. Do you wish to run something at successful update?[N] (y/N) n New configuration file '/tmp/no-ip2.conf' created. mv /tmp/no-ip2.conf /usr/local/etc/no-ip2.conf [root@test noip-2.0.12]# /usr/local/bin/noip2 # 這樣就可以讓您的 noip2 自動的更新您的資料囉! ^_^ 3. noip2 的語法簡介 [root@test root]# noip2 [-CS] 參數說明: -C :重新設定參數,亦即設定剛剛我們上面輸入粗體字的咚咚! 如果您有兩個以上的 no-ip 主機名稱時,就一定需要使用 noip2 -C 來重新設定參數檔案! -S :將目前的 noip2 的狀況顯示出來! 如果不加任何參數,就是將 noip2 直接常駐在記憶體裡面囉!(變成 daemon 囉!) 範例: [root@test root]# noip2 -S Process 32632, started as /usr/local/src/noip-2.0.12/noip2 Using configuration from /usr/local/etc/no-ip2.conf Last IP Address set 140.116.142.213 Account kiki@yahoo.com.tw configured for: host kiki.no-ip.org Address check every 1 minute, directly connected via /dev/ppp0. # 瞧!上面顯示的就是您註冊時的一些相關訊息喔! 4. 設定開機時啟動 noip2 [root@test root]# vi /etc/rc.d/rc.local # 加入底下這一行: /usr/local/bin/noip2 |
如此一來,呵呵!一開機就會啟動 noip2 ,而且還能夠重新設定參數 ( noip2 -C ) 也可以觀察 noip2 的工作狀態!真的是很方便的啦! ^_^
參考資料
- 台灣網路資訊中心:http://www.twnic.net/index3.php
- 國外的領域名稱系統:http://www.netsol.com/
- 國外的領域名稱系統:http://www.dotster.com/
- 荻恩斯科技:http://kevin.adsldns.org
- 台灣地區免費動態DNS系統(中文):http://www.adsldns.org
- 國外的免費 DNS 系統:http://www.no-ip.com
課後練習
- 請簡易說明 /etc/hosts 的用途;
- 請說明『合法授權』的主機名稱需要做什麼?
- 什麼是動態 DNS 系統?(僅說明 client 端)
- 如果您使用 adsl 撥接來上網設定伺服器,那麼該申請哪一類型的主機名稱?為什麼?
前往參考解答

