最近更新時間: 2003/09/09
遠端連線程式的功能:
Telnet 伺服器:
telnet 伺服器:安裝、啟動與關閉服務
telnet 用戶端:好用的連線軟體
telnet 安全性:iptables, TCP_Wrappers, 純建議,
SSH 伺服器:
連線加密技術簡介:
啟動 ssh 服務:
ssh 用戶端連線: ssh, sftp, putty,
詳細設定 sshd 伺服器:/etc/ssh/sshd_config
製作不用密碼可立即登入的 ssh 用戶: ssh-keygen,
安全設定: sshd_config, iptables, TCP_Wrappers,
參考資源
課後練習
遠端連線程式的功能:
- 在這個章節當中,首先,我們要先來瞭解一下,什麼是『遠端連線伺服器』?這個東西的功能為何?我想,您應該已經聽過,一個良好的網路環境當中,一部開放到
Internet 上面的伺服器,基本上,他可以不需要顯示卡、螢幕、鍵盤、滑鼠等等的配備!只要有基本的主機板、CPU、RAM、硬碟再加上一塊好一點的網路卡,並且連上
Internet !哈哈!那麼您要操控這部主機的時候,只要透過網路連線進來,然後進行任何修改即可!嘿!所以囉,這個時候主機自然不需要周邊設備啦!
- 伺服器類型( Server )的連線程式:
- 工作站類型( Workstation )的連線程式:
以鳥哥個人為例,目前鳥哥管理大約七、八部左右的 Unix-Like 主機,這些主機都不在同一個地方,分佈在南台灣各處!那麼當有新的套件的漏洞被發佈,或者是需要進行一些額外的設定的時候, 是否鳥哥本人一定要到現場嗎?當然不需要, 只要透過網路連線到該主機上面,就可以進行任何工作了!真的就好像在螢幕前面工作一般的輕鬆愉快!^_^!這就是遠端連線伺服器啦!遠端連線伺服器的功能當然還不只如此!舉個例子來說:當您的工作需要使用到 Linux 的強大的編譯功能時,那麼您一定需要 Linux 對吧!而且最好是運算速度快一點的主機,這個時候您可以將您研究室最快的那一部主機開放出來,設定一下遠端連線伺服器,讓您的學生啦,或者是研究室的同仁啦,可以透過這部機器幫他們進行研究的工作,這個時候,您的主機就可以讓多人進行分享 Linux 運算的功能啦!
在早期的網路世界裡,由於只有 Unix 機器,而且個人電腦還不流行的時候,想要使用大型主機來進行數值程式的運算時(在我們工程界,比較常使用 Fortran 這一類的程式語言,至於 C 語言則較少碰~),就需要向學校單位申請工作站的帳號,並且以遠端連線程式連進主機,以使用 Unix 的資源來進行我們的數值模式運算!所以啦,那個遠端連線伺服器的設定,基本上,對於系統管理員是很重要的!尤其對於大型的工作站類型的 Unix-Like 主機,由於很多人都需要使用到他的 CPU 運算核心功能,或者是他的編譯程式( compiler )來進行運算,這時的遠端連線就更形重要啦!
那麼是否每一部連上 Internet 上面的主機都應該要開放遠端連線的功能呢?其實並不盡然,還是需要針對您的主機來進行規劃的,我們底下分伺服器與工作站來說明:
在一般開放網際網路服務的伺服器中,由於開放的服務可能會有較為重要的資訊,而遠端連線程式連進主機之後,可以進行的工作又太多了(幾乎就像在主機前面工作一般!),因此網際網路的遠端連線程式通常僅針對少部分系統維護者開放而已!除非必要,否則 Server 類型的主機還真的不建議開放連線的服務呢!以鳥哥為例,我的主機提供了我們研究室使用 Mail 與 Internet 上面的 WWW 服務,如果還主動提供遠端連線的話,那麼萬一不小心被入侵,那可就傷腦筋了!因此,鳥哥僅開放『很小部分的網域』讓系統管理員連進來,其他來源的 IP 一律抵擋!不許使用遠端連線的功能呢!
至於工作站的情況就跟伺服器不太一樣了!工作站常常僅針對內部的幾個使用者開放而已,通常是不希望連上 Internet 的啦!而且所謂的工作站自然就是用來做工的!例如鳥哥的其中一部 Linux 就是專門用來進行大型的數值模式計算模擬之用!這個時候的遠端連線伺服器可能就得要對多人啟動了!因為工作站的強大運算功能可以讓很多人一同使用他的計算能力!而且也可以免除每部電腦都得要安裝 compiler 的窘境!要知道,某些工程用的 compiler 是粉貴的~
好了,那麼什麼是『明碼』呢?為什麼 telnet 使用明碼就比較不安全?所謂的明碼就是:當我們的資料封包在網路上流竄時,該資料封包的內容為資料的原始格式,例如我們在 telnet 下達的指令與密碼等等,都會以類似 ASCII 的格式傳送到主機端,而主機端就藉由這些資料來下達指令。好了,想一想,如果這些資料封包在經過某些 broadcast 或者是 Router 時,被有心人士捉去,那麼他將會完整的取得您的資料喔!所以啦,萬一您的資料封包裡面含有信用卡資料、密碼、身份確認等重要資訊時,是否很危險吶?!因此,目前我們通常都希望使用可以將這些在網路上面跑的資料加密的技術,以增加資料在 Internet 上面傳送的安全性啊!
Telnet 伺服器:
- 知道 telnet 是什麼嗎?咦!不就是連接 BBS 的工具嗎?!嘿嘿!沒錯!他確實也是
BBS 軟體類的一個伺服器啦!不過這裡我們暫不玩弄 BBS ! telnet 可以說是歷史相當悠久的遠端連線伺服器哩!而且支援他的軟體也相當的多!例如知名的
netterm 就直接支援他啦!連線之後的界面也漂亮,在 client 端的中文傳輸與輸入也沒有問題!相當的不錯用!不過,他最麻煩的地方就是.....比較不安全而已啦~
- 一個是 telnet-client (或 telnet),這個套件提供的是 telnet 用戶端的連線程式;
- 另一個是 telnet-server 套件,這個才是真正的 Telnet server 軟體喔!
- 使用 ntsysv 或 chkconfig:
- 使用 vi 修改 /etc/xinetd.d/telnet 這個檔案:
- 按下 Windows 內的 『開始』
- 選擇 『執行』
- 在出現的視窗中輸入 『telnet your.IP.or.hostname』
- 以比較限制的設定檔來規範連線的 IP :
- root 不能直接以 telnet 連接上主機:
- 加上防火牆 iptables:
- 加上防火牆 /etc/hosts.allow(deny) 機制:
- 建議事項:
- 非必要時,不要啟動 telnet ,如果真的需要啟動 telnet ,那麼也請在啟動並且使用完畢之後,立即將他關掉!
- 如果確定真的要啟動 telnet 時,請確定好限制的連線範圍,使用 iptables 來設定連線的限制區域;
- 加上 TCP_Wrappers 的輔助,加強防火牆的功能!
- 隨時注意登錄檔案裡面關於 login 的事項!並且不要讓 root 能以 telnet 登入 Linux 主機!
底下我們談一談怎麼啟動與使用 telnet 伺服器吧!
telnet 伺服器:安裝、啟動與關閉服務
安裝:
如何啟用 Telnet 這個好用的伺服器呢?首先,當然一定要有安裝囉!由於近年來由於 telnet 是以明碼在傳輸的問題,所以在新的 Linux 版本上面,已經都將 telnet 這個伺服器排除在『先發名單』之外啦,也就是說,很多 Linux distributions 預設是不安裝 telnet 的,不過,在每個主要的 Linux distributions 還是有提供 telnet 套件在光碟當中啦!所以您要拿出原版光碟,並且安裝好他,就可以啦!如何確認是否已經安裝了 telnet 呢?最簡單的方法就是使用最廣泛被使用的 RPM 啦!
| [root@test
root]# rpm -qa | grep telnet
telnet-server-krb5-1.2.5-1mdk telnet-client-krb5-1.2.5-1mdk # 上面是 Mandrake 9.0 的範例;或底下是 Red Hat 7.2 的範例 telnet-0.17-20 telnet-server-0.17-20 |
需要特別留意的是,如果要提供 telnet 連線服務,通常需要安裝兩個 RPM 喔:
所以,如果您的系統上面找不到等一下要設定的 telnet 設定檔,肯定就是沒有安裝 telnet 啦!請拿出您的光碟片,然後 mount 之後,趕緊的安裝他吧!否則就無法進行下一步的設定啦! ^_^
啟動與關閉:
還記得『鳥哥的 Linux 私房菜 -- 基礎學習篇』裡面的『認識服務 ( daemon )』那個章節吧!?要記得 super daemon 呦!?沒錯啦,我們的 telnet 就是掛在 super daemon 底下的一支服務而已!那個咚咚就是有名的 xinetd 囉!( 註:在某些舊版的套件上面也有使用 inetd 的,啟動的方式有點不太一樣,不過差異不大啦!只要懂得基本的常識,那麼就不會有問題囉!所以鳥哥才會要大家先讀完 Linux 基礎篇 啦! ) 啟動的方式就是:
- (1)將 xinetd 裡面關於 telnet 的項目開啟,然後
(2)重新啟動一次 xinetd 就成功啦!
那麼如何開啟 telnet 的項目呢?很簡單,有兩個方式:
還記得小紅帽 ( Red Hat ) 裡面的 ntsysv 這個好用的東西嗎?對了,在 Red Hat 底下有這麼一個好用的設定工具,您可以使用 ntsysv 出現的視窗之中,將 telnet 勾選起來,然後按下 OK 離開即可囉!
那麼如果不是 Red Hat 的 Linux 系統呢?基本上, ntsysv 也只是修改 /etc/xinetd.d 這個目錄下的資料而已,所以我們當然可以手動自己修改他啦!
| [root@test
root]# vi /etc/xinetd.d/telnet
# default: on # description: The telnet server serves telnet sessions; it uses \ # unencrypted username/password pairs for authentication. service telnet { disable = yes<==就是改這裡,將 yes 改成 no 即可! flags = REUSE socket_type = stream wait = no user = root server = /usr/sbin/in.telnetd log_on_failure += USERID } |
設定完開啟之後,自然就是要啟動啦,剛剛提到 telnet 是掛在 xinetd 底下的,所以自然只要重新啟動 xinetd 就能夠將 xinetd 裡頭的設定重新讀進來,所以剛剛設定啟動的 telnet 自然也就可以被啟動啦!而啟動的方式也有兩種方式,其中 service 這個指令僅支援在 Red Hat 與 Mandrake 底下,所以通常我還是以 /etc/rc.d/init.d 底下的 scripts 為啟動的主要方法啦!
| 方法一:僅支援
Red Hat 或 Mandrake 系統:
[root@test root]# service xinetd restart Stopping xinetd: [ OK ] Starting xinetd: [ OK ] 方法二:正統的啟動方式:
|
| [root@test
root]# netstat -tl
Active Internet connections (only servers) Proto Recv-Q Send-Q Local Address Foreign Address State tcp 0 0 *:ssh *:* LISTEN tcp 0 0 *:telnet *:* LISTEN |
| step 1: 修改一下
/etc/xinetd.d/telnet 檔案:
[root@test root]# vi /etc/xinetd.d/telnet # default: on # description: The telnet server serves telnet sessions; it uses \ # unencrypted username/password pairs for authentication. service telnet { disable = no<==就是改這裡,將 no 改成 yes 即可! flags = REUSE socket_type = stream wait = no user = root server = /usr/sbin/in.telnetd log_on_failure += USERID } step 2: 重新啟動
xinet 即可:
|
telnet 用戶端:好用的連線軟體
剛剛上面提到的都是在伺服器端的設定而已!那麼在客戶端有什麼好用的軟體可以連上 Server 的呢?最常見到的應該就是 netterm 這個鼎鼎大名的連線軟體了吧!我想,只要玩過 BBS 的大概都曉得這個軟體才對!所以這裡就不提了!另外,目前幾乎所有的作業系統都提供了 telnet 這個程式,這個程式可以直接輕易的就連上 telnet server 呢!例如您要在 Linux 上面連上自己的 telnet 伺服器,可以這樣做:
| [root@test
root]# telnet localhost
Trying 127.0.0.1... Connected to localhost. Escape character is '^]'. Red Hat Linux release 7.2 (Enigma) Kernel 2.4.18 on an i586 login: test <==輸入帳號 Password: <==輸入密碼請注意!密碼並不會在螢幕上面顯示任何的字眼 Last login: Thu Oct 3 11:59:29 from test_inside <==提示上次登入的位址 You have new mail. <==自上次登入以來,是否信箱內有新信件!? [test@test test]$ <==這裡就進入了 telnet 的連線程序當中了! [test@test test]$ exit <==離開這次 telnet 的登入! |
這樣就可以進入 Linux 的環境中了!很方便吧!當然啦!您也可以使用類似 netterm 這個很棒的連線軟體來連線的,這裡我們就不示範啦!那如果想要在 Linux 的終端機看到中文呢?!呵呵!這就需要 JMCCE 這個套件的支援了!請參考:Linux 常用指令介紹之終端機中文介面顯示。
telnet 安全性:iptables, TCP_Wrappers, 純建議,
telnet 這個伺服器方便歸方便,但總是一個不太好的連線解決方案,因為畢竟他是一個以『明碼』傳輸的協定,什麼是『明碼』呢?簡單的說,當您使用 telnet 的時候,您總是會在螢幕上面輸入資料吧!?最簡單的例子,就是您總是要登入 telnet 的主機畫面吧!那麼您總是需要輸入帳號與密碼吧?當主機接受您的資料後才能進行確認!這個時候,您的資料就會經過 telnet 這個協定來傳輸到主機上面,這個傳輸時候的資料基本上是沒有加密過的,也就是類似 ASCII 碼的咚咚!如此一來的話,只要有心人士在某個 router 點去監聽您的封包,而且將該資料封包捉下來,進行解讀的工作,哈哈!那麼您的帳號與密碼就被拿走了!所以下一次,別人就可以利用您的帳號與密碼了~很危險對不對~是很危險!除此之外, telnet 由於太老牌了,很多的駭客程式已經都寫了破解的方式,所以啟動之後,其實也很危險的啦!因此實在是建議不要啟用 telnet 說!無論如何,有些朋友由於舊軟體的關係,還是需要使用到 telnet 來連線,那麼我們就提一些基本的注意事項好了!
事實上, xinetd 這個 super daemon 提供的些許的保護措施了,您可以針對您的主機的多重介面(有對內以及對外喔!)來提供不同保護等級的措施!底下列出一個範例,不過,更多的資訊請再回到『鳥哥的 Linux 私房菜 -- 基礎學習篇』當中去查閱一下『認識服務 』那一章裡面的詳細設定說明吧!
| [root@test
root]# vi /etc/xinetd.d/telnet
# This file had been modified by VBird 2002/11/04 # First is about inside the network service telnet { disable = no bind = 192.168.1.2 only_from = 192.168.1.0/24 # 上面這兩行說明僅提供內部網域! instance = UNLIMITED nice = 0 flags = REUSE socket_type = stream wait = no user = root server = /usr/sbin/telnetd server_args = -a none log_on_failure += USERID } # Second is
about the outside domain's settings
|
既然 telnet 不是很安全,自然預設的情況之下就是無法允許 root 以 telnet 登入 Linux 主機的!但是,事實上, telnet 只是利用一些較為安全的機制來防止 root 登入而已~所以囉,假如您確定您的環境夠安全(例如您的主機並沒有連上 Internet ),並且想要開放 root 以 telnet 登入 Linux 主機的話,請直接將 /etc/securetty 更改檔名即可!
| [root@test root]# mv /etc/securetty /etc/securetty.bak |
| [root @test
/root]# vi /etc/pam.d/login
#%PAM-1.0 #auth required /lib/security/pam_securetty.so # 將上面這一行加上 # 註解掉! auth required /lib/security/pam_stack.so service=system-auth auth required /lib/security/pam_nologin.so account required /lib/security/pam_stack.so service=system-auth password required /lib/security/pam_stack.so service=system-auth session required /lib/security/pam_stack.so service=system-auth session optional /lib/security/pam_console.so |
針對 telnet 加設防火牆 iptables 是一個好主意!如果您已經參考了前面章節提到的『簡易防火牆架設』一文,並且使用裡面的 scripts 的話,那麼不用擔心 telnet 啦!基本上,他原本就僅對內部開放 telnet ,外部是無法連上您的 telnet 的!但是,若是您自己設定了自己的防火牆機制之後,那麼想要針對 192.168.0.0/24 這個網域,及 61.xxx.xxx.xxx 這個 IP 進行 telnet 的開放呢?可以增加這幾行在您的 iptables 規則之內(請注意:防火牆的規則順序是很重要的!所以再回頭看看 簡易防火牆架設 一文是有必要的!)
| /sbin/iptables
-A INPUT -p tcp -i eth0 -s 192.168.0.0/24 --dport 23 -j ACCEPT
/sbin/iptables -A INPUT -p tcp -i eth0 -s 61.xxx.xxx.xxx --dport 23 -j ACCEPT /sbin/iptables -A INPUT -p tcp -i eth0 --dport 23 -j DROP |
防火牆的機制是越多越好!永遠也不嫌多的啦!這裡也可以使用 TCP_Wrappers 的機制呢!剛剛是開放了 192.168.0.0/24 這個網段,但是如果您只想要其中的 192.168.0.1 ~ 192.168.0.5 進入呢?而其他的 IP 只要一經連線,就會被記錄該 IP ,以提供 root 查詢呢?可以這樣做:
| [root@test
root]# vi /etc/hosts.allow
in.telnetd: 192.168.0.1, 192.168.0.2, 192.168.0.3, 192.168.0.4, 192.168.0.5: allow [root@test root]#
vi
/etc/hosts.deny
|
說真的, telnet 真的不是很安全的!簡直應該說為『危險』等級的服務,所以盡量不要啟動他啦:
SSH 伺服器:
- 既然 telnet 不是很安全,那麼我又需要以遠端連線服務來操控我的 Linux
主機,那麼應該怎麼辦呀!?最好的方法當然就是以較為安全的連線機制的方案來解決連線的問題囉!那麼該如何解決這樣的問題呢?這也不難啦,使用
SSH 即可。那麼 SSH 是什麼呢?他有什麼特異功能?簡單的來說,SSH
是 Secure SHell protocol 的簡寫,他可以經由將連線的封包加密的技術,來進行資料的傳遞,因此,資料當然就比較安全囉!這個
SSH 可以用來取代 Internet 上面較不安全的 finger, R Shell (rcp, rlogin,
rsh 等指令), talk 及 telnet 等連線模式。底下我們將先簡介一下 SSH 的連線模式,來說明為什麼
SSH 會比較安全呢!
- 一個就是類似 telnet 的遠端連線使用 shell 的伺服器,亦即是俗稱的 ssh ;
- 另一個就是類似 FTP 服務的 sftp-server !提供更安全的 FTP 服務。
特別注意:這個 SSH 協定,在預設的狀態中,本身就提供兩個伺服器功能:
連線加密技術簡介:
基本上,加密的技術通常是藉由所謂的『一對公鑰與私鑰』亦即『Public and Private keys』來進行加密與解密的動作!如下圖所示,當 SSH 伺服器主機啟動該服務之後,主機端會產生一支公鑰,而身為個人電腦的您 ( client 端 ),在進行與 server 的連線時,可以藉由 Client 端隨機自行產生的私鑰來提供 server 的連線之用,也可以直接藉由 server 提供的私鑰來進行連線!這個與進行連線時選擇的加密版本有關,等一下我們再提!

在上面的圖示中,我們可以知道,當資料由 Server 端傳送到 Client 端時,這些資料會先經過『公鑰, Public Key』來進行加密的行為,所以,在傳輸的過程中,這些資料本身是經過加密的,因此,即使這些資料在途中被截取時,要破解這些加密的資料,還是得要花費上好長一段時間的。那麼等這些經過公鑰加密的資料傳送到 Client 端之後,就可以藉由所謂的『私鑰, Private Key』來進行解密的動作。需要注意的是,這些公鑰與私鑰在每一部電腦上面都不一樣,所以,您與 Server 的連線對其他人來說,都是很難去破解的呢!那麼這些公鑰與私鑰是如何產生的呢?底下我們來談一談目前 SSH 的兩種版本的連線模式囉!
- SSH protocol version 1:
- 當每次 SSH daemon (sshd) 啟動時,就會產生一支 768-bit 的公鑰(或稱為 server key)存放在 Server 中;
- 若有 client 端的需求傳送來時,那麼 Server 就會將這一支公鑰傳給 client ,而 Client 藉由比對本身的 RSA 加密方式來確認這一支公鑰;
- 在 Client 接受這個 768-bit 的 server key 之後,Client 自己也會隨機產生一支 256-bit 的私鑰(host key),並且以加密的方式將 server key 與 host key 整合成一支完整的 Key ,並且將這支 Key 也傳送給 server ;
- 之後,Server 與 Client 在這次的連線當中,就以這一支 1024-bit 的 Key 來進行資料的傳遞!
- SSH protocol version 2:
每一部主機都可以使用 RSA 加密方式來產生一個 1024-bit 的 RSA Key ,這個 RSA 的加密方式,主要就是用來產生公鑰與私鑰的演算方法!這個 version 1 的整個連線的加密步驟可以簡單的這麼看:
與 version 1 不同的是,在 version 2 當中將不再產生 server key 了,所以,當 Client 端連線到 Server 端時,兩者將藉由 Diffie-Hellman key 的演算方式來產生一個分享的 Key ,之後兩者將藉由類似 Blowfish 的演算方式進行同步解密的動作!
每一個 sshd 都提供這兩個版本的連線,而決定這兩種模式連線的,就必需要在 client 端連線時選擇連線的模式才能確認。目前預設情況下,會自動使用 version 2 的連線模式喔!而由於我們的連線資料中,經過了這個 Public 與 Private Key 的加密、解密動作,所以在中間的傳送過程中,當然就比較安全的多囉!(註:目前使用 SSH 來連線時,比較建議使用 version 2 的演算法喔!)
啟動 ssh 服務:
事實上,在我們使用的 Linux 系統當中,預設就已經含有 SSH 的所有需要的套件了!這包含了可以產生密碼等協定的 OpenSSL 套件與 OpenSSH 套件,所以呢,要啟動 SSH 真的是太簡單了!就直接給他啟動就是了!此外,在目前的 Linux Distributions 當中,都是預設啟動 SSH 的,所以一點都不麻煩,因為不用去設定,他就已經啟動了!哇!真是爽快~無論如何,我們還是得說一說這個啟動的方式吧!直接啟動就是以 SSH daemon ,簡稱為 sshd 來啟動的,所以,手動可以這樣啟動:
| [root@test
root]# /etc/rc.d/init.d/sshd start
[root@test root]# service sshd start [root@test root]# netstat -tl Active Internet connections (only servers) Proto Recv-Q Send-Q Local Address Foreign Address State tcp 0 0 *:ssh *:* LISTEN |
上面兩種方式都可以直接手動啟動 sshd 這個服務!然後使用 netstat -tl 看看能不能看到 ssh 的服務在監聽呢!?如果出現了上面那一行斜體字,就表示您的 SSH 已經正確的啟動囉!這真是太簡單了吧!沒錯,但是他就是這麼簡單~
那麼我要如何在開機的時候就啟動這個 sshd 呢?如果是 Red Hat 的系統,可以使用 ntsysv 這支程式,而 Mandrake 可以使用 chkconfig 這個程式!至於 OpenLinux 則可以到 /etc/sysconfig/daemons 去看看喔!
這個方式僅適合在已經有 OpenSSH 的 Linux Distributions 當中,如果以 Red Hat 6.x 為例,他並沒有預設使用 SSH 怎麼辦?別擔心,可以參考一下底下這個鳥哥之前寫過的網頁,有詳細的說明使用 tarball 安裝的步驟呢!
- 使用 Tarbal 安裝 SSH 以及升級 SSH 可能會遇到的問題說明
(http://linux.vbird.org/linux_server/0310telnetssh/0310telnetssh-2.php)
- 需要注意的是, SSH 不但提供了 shell 給我們使用,亦即是 ssh protocol
的主要目的,同時亦提供了一個較為安全的 FTP server ,亦即是 ssh-ftp server
給我們當成是 FTP 來使用!所以,這個 sshd 可以同時提供
shell 與 ftp 喔!而且都是架構在 port 22 上面的呢!所以,底下我們就來提一提,那麼怎麼樣由
Client 端連接上 Server 端呢?同時,如何以 FTP 的服務來連接上 Server 並且使用
FTP 的功能呢?
ssh 用戶端連線:
由於 Linux 與 Windows 這兩個用戶端的 Client 連線軟體並不一樣,所以我們分為兩個部分來說明:
-
Linux 用戶端:
ssh
在 Linux 用戶端方面,我們主要以 ssh 進行一般連線,而以 sftp 進行 FTP 的使用連線!分別簡介如下:
這裡請特別留意的是,如果直接以『 ssh hostname 』這個指令來連接進入 hostname 這個主機時,則進入 hostname 這個主機的『帳號名稱』將會是目前您所在的這個環境當中的使用者帳號!以上面為例,因為我是以 root 的身份在執行,所以如果我執行了『 ssh host.domain.name 』時,那麼對方 host.domain.name 這部主機,就會以 root 的身份來讓我進行密碼確認的登入動作!因此,為了避免這樣的麻煩,通常我都是以簡單的 e-mail 的寫法來登入遠方的主機,例如『ssh user@hostname 』即表示,我是以 user 這個帳號去登入 hostname 這部主機的意思。當然,也可以使用 -l username 這樣的形式來書寫!登入對方主機之後,其他的所有執行行為都跟在 Linux 主機內沒有兩樣~所以,真的是很簡單吧! ^_^ 這樣就可以達到遠端控管主機的目的了!此外,在預設的情況下, SSH 是『允許您以 root 的身份登入』喔!呵呵!更是爽快啦!此外,請特別留意的是,當您要連接到對方的主機時,如果是首次連接,那麼 Server 會問您,您的連線的 Key 尚未被建立,要不要接受 Server 傳來的 Key ,並建立起連線呢?呵呵!這個時候請『務必要輸入 yes 而不是 y 或 Y』,這樣程式才會接受喔!
除此之外,因為 ssh 這支程式預設會將主機端的 public key 記錄下來,放置在 /home/youraccount/.ssh/known_hosts 當中,以利未來的連線之用。不過,由我們剛剛對於連線加密機制的探討當中,可以發現在 SSH 主機重新開機之後,那個 Public Key 會自動的更新,所以,當您的 SSH 主機經過重新開機,而您的 Client 再以 ssh 這支程式連線時,就會發現如下的錯誤喔:
[root@test root]# ssh user@hostname
@@@@@@@@@@@@@@@@@@@@@@@@@@@@@@@@@@@@@@@@@@@@@@@@@@@@@@@@@@@
@ WARNING: REMOTE HOST IDENTIFICATION HAS CHANGED! @
@@@@@@@@@@@@@@@@@@@@@@@@@@@@@@@@@@@@@@@@@@@@@@@@@@@@@@@@@@@
IT IS POSSIBLE THAT SOMEONE IS DOING SOMETHING NASTY!
Someone could be eavesdropping on you right now (man-in-the-middle attack)!
It is also possible that the RSA host key has just been changed.
The fingerprint for the RSA key sent by the remote host is
6e:1a:60:d0:ee:d0:7c:91:df:94:de:09:35:7b:08:ba.
Please contact your system administrator.
Add correct host key in /root/.ssh/known_hosts to get rid of this message.
Offending key in /root/.ssh/known_hosts:8
RSA host key for hostname has changed and you have requested strict checking.
Host key verification failed.
這個錯誤訊息在告訴您,上次所登錄的遠端 SSH 主機的 Keys 已經被改過了(最可能的原因就是重新開機啦!),所以無法繼續登入~呵呵!這個時候怎麼辦?很簡單啊!進入您的家目錄的 ~/.ssh 裡面,編輯一下 known_hosts ,將欲連接的主機名稱的 Key 給他消除,就可以重新連線啦!
那麼如何使用 SSH FTP 的功能呢?也是很容易啦!就是使用 sftp 這支程式即可!而登入的方式與 ssh 相同,都是使用 sftp -l username hostname 或者直接以 sftp user@hosname 來書寫!執行之後會有底下的模樣:
sftp 一般連線的使用方式:
[root@test root]# sftp test@test.linux.org
test@test.linux.org's password: <==請輸入 test 這個使用者的密碼!
sftp> <==等待您輸入指令!
進入到 sftp 之後,那就跟在一般 FTP 模式下的操作方法沒有兩樣了!底下我們就來談一談, sftp 這個介面下的使用指令吧!
針對遠方主機(Server)之行為 變換目錄到 /etc/test 或其他目錄 cd /etc/test
cd PATH列出目前所在目錄下的檔案或目錄 ls
dir建立目錄 mkdir directory 刪除目錄 rmdir directory 顯示目前所在的目錄 pwd 更改檔案或目錄群組 chgrp groupname PATH 更改檔案或目錄擁有者 chown username PATH 更改檔案或目錄的權限 chmod 644 PATH
其中,644 與權限有關!回去看基礎篇!建立連結檔 ln oldname newname 刪除檔案或目錄 rm PATH 更改檔案或目錄名稱 rename oldname newname 離開遠端主機 exit
bye針對本機(Client)之行為(都加上 l, L 的小寫 ) 變換目錄到本機的 PATH 當中 lcd PATH 列出目前本機所在目錄下的檔名 lls 在本機建立目錄 lmkdir 顯示目前所在的本機目錄 lpwd 檔案傳輸 將檔案由本機上傳到遠端主機 put [本機目錄或檔案] [遠端]
put [本機目錄或檔案]
如果是這種格式,則檔案會放置到目前遠端主機的目錄下!將檔案由遠端主機下載回來 get [遠端主機目錄或檔案] [本機]
get [遠端主機目錄或檔案]
若是這種格式,則檔案會放置在目前本機所在的目錄當中!可以使用萬用字元,例如:
get *
get *.rpm
亦是可以的格式!
就整體而言, sftp 在 Linux 底下,如果不考慮圖形介面,那麼他已經可以取代 FTP 了呢!因為所有的功能都已經涵蓋啦!因此,在不考慮到圖形介面的 FTP 軟體時,可以直接關掉 FTP 的服務,而改以 sftp-server 來提供 FTP 的服務吧! ^_^
- 好了,那麼要取得哪幾個程式呢?其實只要 putty.exe 及 psftp.exe 這兩支程式就夠了!分別用來登入
shell 及 FTP 的呢!
- putty:
直接在 Windows 底下執行,執行的圖示有點像底下這樣:
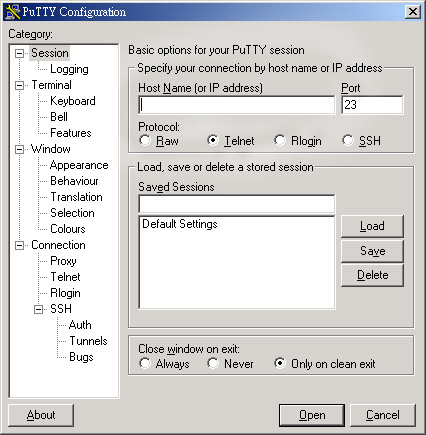
這個時候請注意,由於我們比較喜歡將固定的幾個主機的IP記錄下來,所以在這裡我們需要先進行一些基本的設定才行!在上圖中,我們需要填寫:
- (1)HostName(or IP address) 那一項,及
(2)Saved Sessions 取個好記的名字,
(3)並且選擇 SSH 那個選項才行!
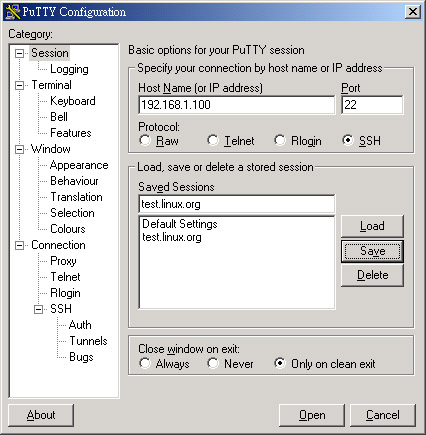
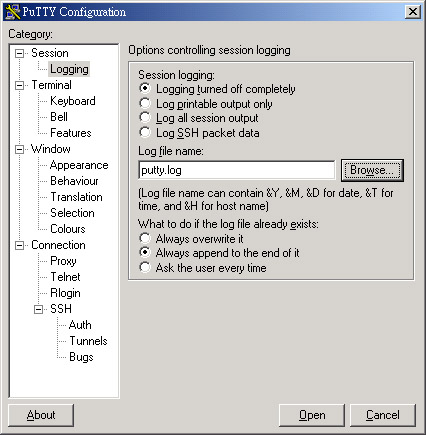
請千萬記得,填寫完畢之後,一定要按下右邊的『Save』按鍵,這樣您的設定才會被記錄下來喔!接著下來,我們要設定的是每次登入的時候,都會進行記錄的項目,所以,您可以在左邊的畫面上面按下『Logging』然後將右邊的『Always append to the end of it』,這樣才不會每次登入的時候,系統都要問您一次,是否需要記錄!
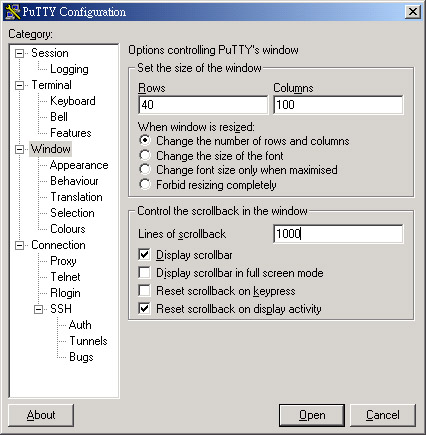
接著下來,我們還可以調整整個 putty 的螢幕大小呢!以下圖為例,我設定我的登入畫面為 40 行與 100 個字元!這樣的畫面比起傳統的 24 * 80 要大的多,看起來也比較舒服就是了~那麼那個 1000 表示我的捲軸有 1000 行的紀錄,可以方便我往前查詢呢!
調整完了螢幕的大小之後,再來這是最重要的:『您要以哪一個版本的 SSH 演算法登入?!』前面說過,我們預設是以 version2 來登入的,所以這裡我們可以調整為 2 那個項目!這樣每次登入都會以 version 2 的模式登入主機了!
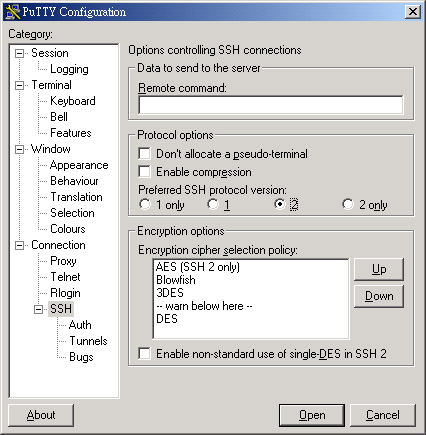
好了,已經都設定完畢了,再來當然又是要記錄囉!所以請回到『Session』的設定裡面,再按下一次『Save』,這個時候在中間的大框框就會出現您輸入的記錄名稱,然後,以後要登入 SSH 主機時,就直接給他點兩下 test.linux.org 那個(就是您剛剛自行設定的紀錄名稱),就可以進入您所點選的主機囉!
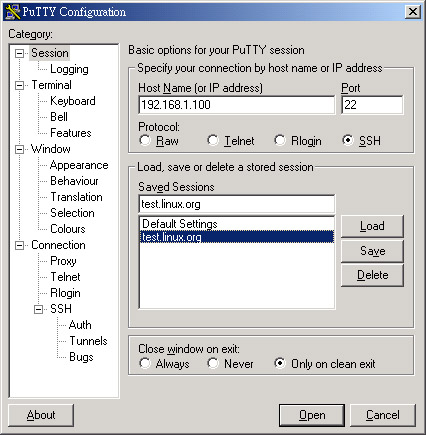
整個 putty 大致上的流程就是這樣!如此一來,您就可以在 Windows 上面以 SSH 的協定,登入遠端的 Linux 主機嚕!粉方便吧! ^_^ !如果還要其他的設定,那麼就直接修改 Saved Sessions 與 HostName 這兩個項目,然後再次給他 Save ,嘿嘿!就又多一個設定值了!而且還是跟剛剛的設定值相同!很容易設定的啦!那麼如果想要中文支援的話,目前 putty 已經支援中文啦!您可以輸入中文喔!不過需要修改一下字元集,選擇左邊畫面的『window』項目,並選擇『Appearance』設定內容,設定:
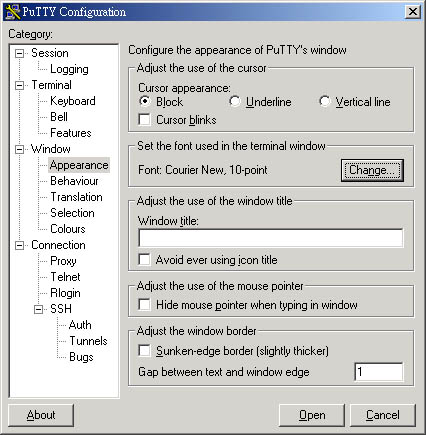
在出現的上面框框中,選擇右邊第二個項目內的『Change』去修改字元集顯示:
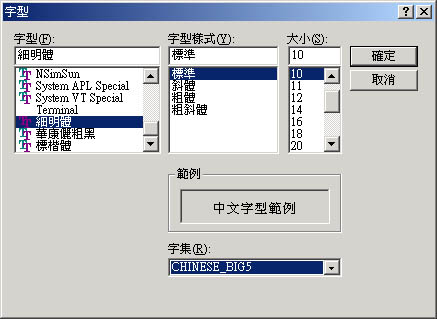
將(1)字型設定為細明體(2)字集設定為『Big5』,如此一來,您的 putty 就支援中文的輸入囉! ^_^
- psftp:
這一支程式的重點則是在於以 sftp 連線上 Server 。連線的方式可以直接點選 psftp 這個檔案,讓他直接啟動,則會出現下面的圖樣:
| psftp: no hostname
specified; use "open host.name" to connect
psftp> |
| psftp: no hostname
specified; use "open host.name" to connect
psftp> open test.linux.org login as: test Using username "test". test@test.linux.org's password: Remote working directory is /home/test psftp> |
詳細設定 sshd 伺服器
基本上,所有的 ssh 相關設定都放在 /etc/ssh/sshd_config 裡面!不過,每個 Linux distribution 的預設設定都不太相同,所以我們有必要來瞭解一下整個設定值的意義為何才好!
| # 1. 關於 SSH
Server 的整體設定,包含使用的 port 啦,以及使用的密碼演算方式
Port 22 # SSH 預設使用 22 這個 port,您也可以使用多的 port ! # 亦即重複使用 port 這個設定項目即可! Protocol 2,1 # 選擇的 SSH 協定版本,可以是 1 也可以是 2 , # 如果要同時支援兩者,就必須要使用 2,1 這個分隔了! #ListenAddress 0.0.0.0 # 監聽的主機介面卡!舉個例子來說,如果您有兩個 IP, # 分別是 192.168.0.100 及 192.168.2.20 ,那麼只想要 # 開放 192.168.0.100 時,就可以寫如同下面的樣式: ListenAddress 192.168.0.100 # 只監聽來自 192.168.0.100 這個 IP 的SSH連線。 # 如果不使用設定的話,則預設所有介面均接受 SSH PidFile /var/run/sshd.pid # 可以放置 SSHD 這個 PID 的檔案!左列為預設值 LoginGraceTime 600 # 當使用者連上 SSH server 之後,會出現輸入密碼的畫面, # 在該畫面中,在多久時間內沒有成功連上 SSH server , # 就斷線!時間為秒! Compression yes # 是否可以使用壓縮指令?當然可以囉! # 2. 說明主機的 Private Key 放置的檔案,預設使用下面的檔案即可! HostKey /etc/ssh/ssh_host_key # SSH version 1 使用的私鑰 HostKey /etc/ssh/ssh_host_rsa_key # SSH version 2 使用的 RSA 私鑰 HostKey /etc/ssh/ssh_host_dsa_key # SSH version 2 使用的 DSA 私鑰 # 2.1 關於 version
1 的一些設定!
# 3. 關於登錄檔的訊息資料放置與
daemon 的名稱!
# 4. 安全設定項目!極重要!
# 4.5 登入後的項目:
# 4.6 關於使用者抵擋的設定項目:
# 5. 關於 SFTP
服務的設定項目!
|
基本上,在您的系統中,『除非有必要,否則請不要更改 /etc/ssh/sshd_config 這個檔案的設定值!』因為預設的情況下通常都是最嚴密的 SSH 保護了,因此,可以不需要更動他!上面的說明僅是在讓大家瞭解每個細項的一些基本內容而已!需要注意的是最後一項,如果您不願意開放 SFTP 的話,將最後一行註解掉即可!
另外,如果您修改過上面這個檔案(/etc/ssh/sshd_config),那麼就必需要重新啟動一次 sshd 這個 daemon 才行!亦即是:
/etc/rc.d/init.d/sshd restart
製作不用密碼可立即登入的 ssh 用戶:
咦!既然 SSH 可以使用 Key 來比對資料,並且提供使用者資料的加密功能,那麼可不可能利用這個 Key 就提供使用者自己進入主機,而不需要輸入密碼呢?呵呵!好主意!我們可以將 Client 產生的 Key 給他拷貝到 Server 當中,所以,以後 Client 登入 Server 時,由於兩者在 SSH 要連線的訊號傳遞中,就已經比對過 Key 了,因此,可以立即進入資料傳輸介面中,而不需要再輸入密碼呢!在實作上的步驟可以是:
- 首先,先在 Client 上面建立 Public Key 跟 Private Key 這兩把鑰匙,利用的指令為 ssh-keygen 這個命令;
- 再來,將 Private Key 放在 Client 上面的家目錄,亦即 $HOME/.ssh/ ,並且修改權限為僅有該 User 可讀的狀態;
- 最後,將那把 Public Key 放在任何一個您想要用來登入的主機的 Server 端的某 User 的家目錄內之 .ssh/ 裡面的認證檔案即可完成整個程序。
- 說是好像很困難的樣子,其實步驟真的很簡單,我們依序來進行作業好了!
假設前提:
- a. Server 部分為 test.linux.org 這部 192.168.0.2 的主機,欲使用的 User
為 test 這個帳號;
b. Client 部分為 test2.linux.org 這部 192.168.0.100 PC 的 test2 這個帳號,他要用來登入 192.168.0.2 這部主機的 test 這個帳號。
- 在 Client 端建立 Public 與 Private Key :
- 在 Client 端放置私鑰:
- 在 Server 端放置可以登入的公鑰:
建立的方法真的是簡單到不行!直接在 192.168.0.100 這個 Client 上面,以 test2 這個帳號,使用 ssh-keygen 這個指令來進行 Key 的產生即可!不過,需要注意的是, version 1 與 version 2 使用的密碼演算方式不同,此外, version 2 提供兩個密碼演算的方法,我們這裡僅針對 version 2 的 RSA 這個演算方法進行說明!
| [test2@test2
test2]$ ssh-keygen -t rsa <==這個步驟在產生
Keys
Generating public/private rsa key pair. Enter file in which to save the key (/home/test2/.ssh/id_rsa): Enter passphrase (empty for no passphrase): <==這裡按 Enter Enter same passphrase again: <==再按一次 Enter Your identification has been saved in /home/test2/.ssh/id_rsa. <==這是私鑰 Your public key has been saved in /home/test2/.ssh/id_rsa.pub.<==這是公鑰 The key fingerprint is: c4:ae:d9:02:d1:ba:06:5d:07:e6:92:e6:6a:c8:14:ba test2@test2.linux.org 注意: -t 指的是『使用何種密碼演算方式?』由於我們使用 RSA , 所以直接輸入 -t rsa 即可建立兩支 Keys ! 此外,建立的兩把 Keys 都放置在家目錄下的 .ssh 這個目錄中! 察看一下這兩把 Keys 吧! [test2 @test2
test2]$ ll ~/.ssh
|
在預設的條件中,我們的私鑰必需要放置在家目錄底下的 .ssh 裡面,那麼如果是 version 2 的 RSA 演算法,就需要放置在 $HOME/.ssh/id_rsa 當中!咦!剛好使用 ssh-keygen 就是已經產生在這個目錄下了,所以自然就不需要去調整他了!以我的 test2.linux.org 來看,那麼我的檔案就會放置在 /home/test2/.ssh/id_rsa 這個檔案就是私鑰啦!
既然我們要讓 test2 可以以 test 這個帳號登入 test.linux.org 這部主機,那麼這部主機自然需要保有 test2 的 public key 囉!對的!所以我們必需要將 Client 端建立的 id_rsa.pub 檔案給他拷貝到 test.linux.org 裡頭的 test 這個使用者的家目錄之下!那麼如果您還記得上面的 sshd_config 這個檔案的設定的話,那麼應該就記得『AuthorizedKeysFile』這個設定吧!是的!在被登入的主機的某個帳號,他的公鑰放置的檔案名稱預設就是這個項目所記載的!而他預設的檔名就是 authorized_keys 這個檔案名稱啦!那麼應該怎麼做呢?
| 1. 先在 Client
端以 sftp 將公鑰丟到 test 上面去!
[test2@test2 test2]$ cd ~/.ssh <==切換目錄 [test2@test2 .ssh]$ sftp test@test.linux.org<==連到主機上面 Connecting to test.linux.org... test@test.linux.org's password: <==輸入 test 的密碼 sftp> put id_rsa.pub <==將公鑰丟到 Server 上面去! Uploading id_rsa.pub to /home/test/id_rsa.pub sftp> exit 2. 到 Server
上面,將公鑰轉存到 authorized_keys 檔案中!
|
| [test2@test2 test2]$ ssh test@test.linux.org |
- 很簡單的步驟吧!這樣一來,就可以不需密碼的手續了!無論如何,您要記得的是,
Server 需要有的是 Public Keys ,而 Client 端的則是 Private Keys !則未來,當您還想要登入其他的主機時,只要將您的
public key ( 就是 id_rsa.pub 這個檔案 )給他 copy 到其他主機上面去,並且新增到某帳號的
.ssh/authorized_keys 這個檔案中!哈哈!成功!
安全設定:
好了,那麼關於安全的設定方面,有沒有什麼值得注意的呢?當然是有啦!我們可以先建議幾個項目吧!分別可以由:
- /etc/ssh/sshd_config
- /etc/hosts.allow, /etc/hosts.deny
- iptables
這三方面來著手進行!底下我們就說一說吧!
- /etc/ssh/sshd_config
一般而言,這個檔案的預設項目就已經很完備了!所以,事實上是不太需要更動他的!但是,如果您有些使用者方面的顧慮,那麼可以這樣修正一些問題呢!
- 禁止 root 的登入:任何時候,不許 root 以遠端連線的方式登入,都會是一個好主意!所以這裡蠻建議大家直接將 root 的登入權限拿掉吧!所以,可以修改 /etc/ssh/sshd_config 這個檔案的內容為:
如此一來,以後 root 就不能以 ssh 登入囉!這樣還是比較好的啦! ^_^
[root@test root]# vi /etc/ssh/sshd_config
PermitRootLogin no <==將他改成 no 啦!
[root@test root]# /etc/rc.d/init.d/sshd restart
- 不許某個群組登入:有些特殊情況中,我們想要讓使用者只能使用 sendmail, pop3, ftp 等,但是不希望他可以遠端連線進來,那麼您可以這樣做:
1. 將這些使用者都歸納在某一個特殊群組之下,例如 nossh 這個群組好了;
2. 在 /etc/ssh/sshd_config 當中加入這一行:『DenyGroups nossh』
3. 重新啟動 sshd : /etc/rc.d/init.d/sshd restart
這樣就OK啦!
- 不許某個使用者登入:跟 DenyGroups 類似,使用 DenyUsers 即可!參考 sshd_config 的設定喔!
- /etc/hosts.allow 及 /etc/hosts.deny :
這東西也是很簡單的啦!直接參考: 簡易防火牆架設 一文囉!當然,簡單的方法就是:
[root@test /root]# vi /etc/hosts.allow
sshd: 192.168.0.1, 192.168.0.2, 192.168.0.3, 192.168.0.4, 192.168.0.5: allow[root@test /root]# vi /etc/hosts.deny
sshd : ALL : spawn (/bin/echo Security notice from host `/bin/hostname`; \
/bin/echo; /usr/sbin/safe_finger @%h ) | \
/bin/mail -s "%d -%h security" root@localhost & \
: twist ( /bin/echo -e "\n\nWARNING connectin not allowed. Your attempt has been logged. \n\n\n警告您尚未允許登入,您的連線將會被紀錄,並且作為以後的參考\n\n ". )- iptables
多幾層保護也很好的!所以也可以使用 iptables 喔!參考:簡易防火牆架設 一文囉!
基本上, SSH 還蠻安全的,只要取消 root 的登入權限,那麼問題應該就會比較小一點啦!所以,雖然可以不用設定 iptables ,但是建議針對幾個網域設定一下 /etc/hosts.allow 與 /etc/hosts.deny !加油囉!
參考資源
- OpenSSH 官方網站:http://www.openssh.com/
- OpenSSL 官方網站:http://www.openssl.org/
- putty 官方網站:http://www.chiark.greenend.org.uk/~sgtatham/putty/
- putty 中文網站:http://beta.wsl.sinica.edu.tw/~ylchang/putty/
- pputty 中文網站:http://www.csie.ntu.edu.tw/~piaip/prjs/pputty/
課後練習
- Telnet 與 SSH 都是遠端連線伺服器,為何我們都會推薦使用 SSH 而避免使用 Telnet 呢?原因何在?
- 請嘗試說明 SSH 在 Server 與 Client 端連線時的封包加密機制;
- 請問 SSH 的設定檔是哪一個?如果我要修改讓 root 無法使用 SSH 連線進入我的 SSH 主機,應該如何設定?又,如果要讓 badbird 這個使用者無法登入 SSH 主機,該如何設定?
- 在 Linux 上,預設的 Telnet 與 SSH 伺服器使用的埠口(port number)各為多少?
- 如果發現我無法在 Client 端使用 ssh 程式登入我的 Linux 主機,但是 Linux 主機卻一切正常,可能的原因為何?(防火牆、known_hosts...)
- 既然 ssh 是比較安全的資料封包傳送方式,那麼我就可以在 Internet 上面開放我的 Linux 主機的 SSH 服務了嗎?!請說明您選擇的答案的原因!
前往參考解答
2002/11/14:第一次完成
2003/03/08:加入標頭說明,與修改部分內容,例如 Telnet 伺服器軟體的安裝等等,以及 SSH 的 putty 使用中文狀態!
2003/09/09:將本文進行一些修訂,此外,加入了課後練習!

